How to Screen Record on iPhone: Complete Guide for Podcast Creators
Most podcasters focus exclusively on audio, but your iPhone’s screen recording feature can be a secret weapon for growing your audience with video content.
Here’s the thing: podcast creators often struggle to create engaging video content for social media promotion, tutorials, and behind-the-scenes looks, thinking they need expensive equipment or complex software.
But we’ve worked with thousands of podcasters, and here’s what we’ve learned: your iPhone already has everything you need to create professional promotional videos, tutorials, and social content that amplifies your podcast’s reach.
The truth is, screen recording on iPhone is far more powerful than most creators realize. It’s not just for tech tutorials or gaming videos; it can be a legitimate marketing tool that can help you connect with your audience in new ways.
In this guide, you’ll learn how to screen record on iPhone specifically for podcast promotion and growth. We’ll cover the basic setup, advanced techniques for content creators, and seven powerful ways podcasters use screen recording to build their audience.
By the end, you’ll be ready to turn your iPhone into a content creation studio.
What is iPhone Screen Recording?
iPhone screen recording is a built-in iOS feature that captures everything happening on your screen as a video file. Available since iOS 11, it records your screen interactions, app usage, and can include audio from both your microphone and system sounds.
When you screen record on iPhone, the feature captures:
- Everything visible on your display (swipes, taps, app navigation)
- Your voiceover narration (when microphone is enabled)
- System audio from apps and media
- The exact timing and flow of your interactions
For podcast creators, this opens up incredible possibilities. You can record walkthroughs of your podcast app, show listeners how to subscribe, create behind-the-scenes content showing your workflow, or produce social media teasers featuring your episode artwork and descriptions.
What screen recording doesn’t capture:
- FaceTime calls or phone conversations (privacy protection)
- Content from some streaming services (DRM restrictions)
- Notifications (if you enable Do Not Disturb)
The best part? Your iPhone automatically saves recordings in 9:16 vertical format when held upright, which is perfect for Instagram Stories, TikTok, and YouTube Shorts without any resizing needed.
How to Set Up Screen Recording on iPhone
Setting up screen recording takes less than a minute. Here’s exactly how to do it.
Add Screen Recording to Control Center
First, you need to add the screen recording button to your Control Center. This is a one-time setup:
- Open the Settings app on your iPhone
- Scroll down and tap Control Center
- Look for Screen Recording in the “More Controls” section
- Tap the green plus icon (+) next to Screen Recording
The screen recording button will move to the “Included Controls” section at the top. You can drag it to reorder where it appears in your Control Center if you want quick access.
Access Your Control Center
Now that screen recording is added, here’s how to open Control Center based on your iPhone model:
- For iPhone X and newer (Face ID models): Swipe down from the top-right corner of your screen
- For iPhone 8 and earlier (Home button models): Swipe up from the bottom edge of your screen
You should see a circular record button (it looks like a solid circle inside a ring).
Start Your First Recording
Ready to screen record on iPhone? Here’s the process:
- Open Control Center (swipe down from top-right or up from bottom)
- Tap the gray Record button (circular icon)
- Wait for the 3-second countdown (3, 2, 1…)
- Exit Control Center by swiping up or tapping your screen
Your recording has started. You’ll see a red bar at the top of your screen (or a red bubble in the top-left on newer models) indicating active recording.
Go ahead and navigate to whatever you want to record. The screen recording captures everything you do.
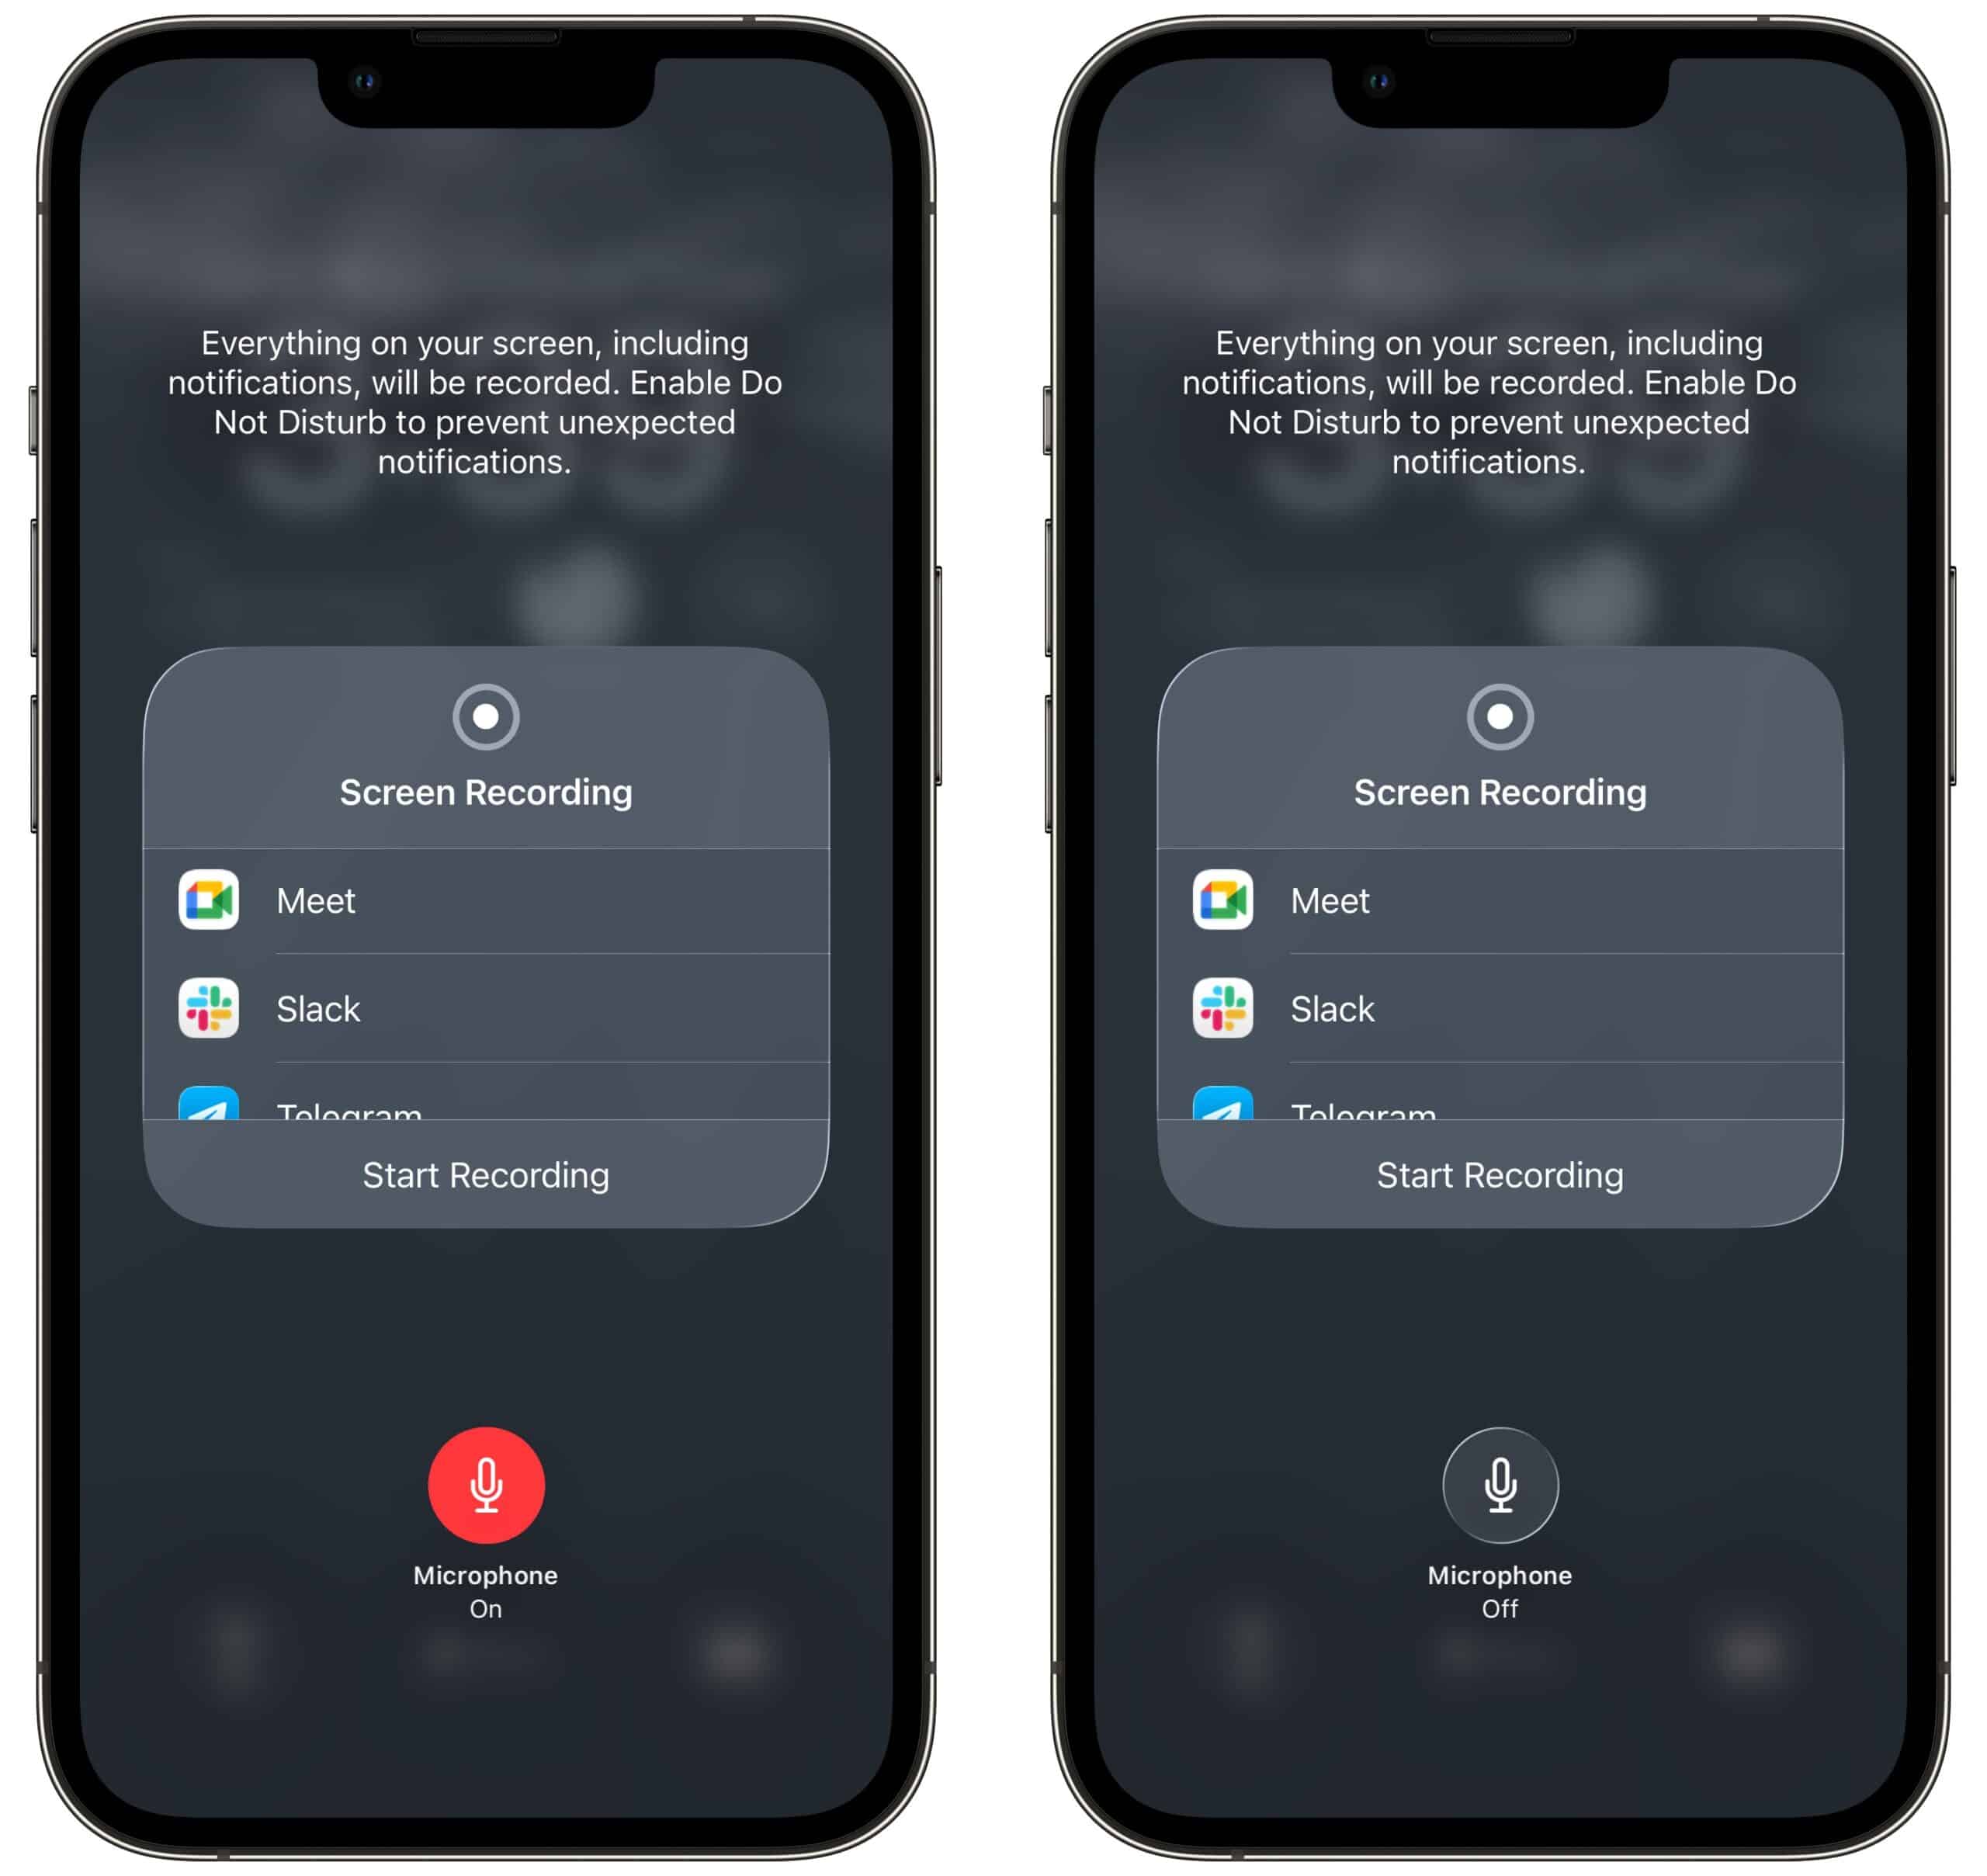
Enable Audio Recording
By default, screen recording only captures your screen, not your voice. To add narration (essential for podcast tutorials):
- Open Control Center
- Press and hold the Record button (don’t just tap it)
- A menu appears with microphone options
- Tap the Microphone icon to turn it ON (it should turn red)
- Tap Start Recording
Now your screen recording will include both what’s on screen and your voice commentary. This is perfect for creating “How to Subscribe to My Podcast” tutorials or explaining your podcast app features to listeners.
Stop Your Recording
When you’re done recording, you have two options:
Option 1: From the status indicator
- Tap the red status bar at the top (or red bubble on newer iPhones)
- Tap Stop in the confirmation dialog
Option 2: From Control Center
- Open Control Center again
- Tap the Record button (now red and active)
- Recording stops immediately
You’ll see a notification banner saying “Screen Recording video saved to Photos.” Your recording is ready to use.
Find Your Screen Recordings
All your screen recordings save automatically to your Photos app: Open the Photos app. You’ll find your screen recording appears as the most recent video on the Library tab (iOS 26)
From here, you can trim, edit, share, or export your recording. The video file includes both your screen capture and any audio you recorded.
Screen Recording for Podcast Content: 7 Powerful Use Cases
Now that you know how to screen record on iPhone, let’s explore how podcasters actually use this feature to grow their shows.
1. Create Podcast Trailer Videos
Your podcast listing on Apple Podcasts or Spotify has great visuals: cover art, episode titles, descriptions, and reviews. Screen recording lets you capture all of this for promotional videos.
Here’s how:
- Open your podcast in Apple Podcasts or Spotify (if it’s not already distributing, you can manually add the RSS feed to Apple Podcasts, Overcast, Pocket Casts, and others)
- Start screen recording with your microphone enabled
- Scroll through your show page, highlighting episodes and reviews
- Add voiceover: “New episodes every Tuesday, subscribe now!”
- Stop recording and you have a 30-second trailer
Post this to Instagram Stories, TikTok, or YouTube Shorts to show potential listeners what your podcast offers. The visual proof of real reviews and consistent episodes builds credibility instantly.
2. Record Behind-the-Scenes Content
Listeners love seeing how the magic happens. Screen recording your podcast workflow creates authentic, engaging content.
Ideas for behind-the-scenes recordings:
- Your episode planning process in Notes or Notion
- Research phase showing browser tabs and article highlights
- Editing timeline in your podcast editing app
- Upload process to your hosting platform
- Analytics dashboard celebrating download milestones
This transparency builds deeper connections with your audience. Podcasters can record quick 60-second clips showing their preparation process before recording episodes, then share them on social media with captions like “Episode 47 in the works.”
3. Tutorial Videos for Your Audience
One of the most valuable ways to use screen recording is teaching your listeners how to engage with your show.
Essential tutorials every podcaster should create:
How to Subscribe Tutorial: Screen record the exact steps to find and subscribe to your show on different apps. Walk through Apple Podcasts, Spotify, and other platforms while narrating each step.
How to Leave a Review: Show the process of writing and submitting a review. Many listeners want to support you but don’t know how.
How to Join Your Community: If you have a Discord, Facebook Group, or Patreon, record the signup and onboarding process so new members aren’t confused.
How to Access Show Notes: Demonstrate where to find links and resources mentioned in episodes.
These tutorials remove friction for your audience. The easier you make it to engage with your podcast, the more engagement you’ll get.
4. Social Media Teasers
Instagram, TikTok, and YouTube Shorts thrive on quick, engaging vertical video. Screen recording your podcast app creates native-feeling content for these platforms.
Effective teaser strategies:
- Record scrolling through your episode list while audio from your latest episode plays
- Capture your podcast artwork with episode title and description visible
- Screen record listener messages or reviews with your reaction
- Show your podcast climbing charts or hitting download milestones
The key is keeping these under 60 seconds. Screen recordings feel more authentic than polished video ads, which often leads to better engagement on social platforms.
5. Analytics Walkthroughs
Transparency about your podcast’s growth creates authenticity and can inspire other creators. Screen recording your analytics dashboard lets you celebrate wins with your community.
What to share:
- Monthly download growth trends
- Geographic listener distribution maps
- Top-performing episodes
- Listener retention curves
- Milestone achievements (10K downloads, 100 reviews, etc.)
When facing a decision like whether to share growth metrics, the question to ask is: “Does this add value for the audience, or does it simply serve as an ego boost?” If the information is genuinely interesting or educational, create a screen recording and share it with context about what was learned.
6. App Demo Videos
If you offer any special access through apps (private podcasts, members-only content, bonus episodes), screen recording demonstrates exactly what subscribers get.
Effective demo content:
- Navigate through your private podcast feed showing exclusive episodes
- Show how hybrid podcasting works with free and paid content
- Walk through your membership area or bonus content library
These demos work great as pre-sales content. Potential subscribers can see exactly what they’re paying for, which increases conversion rates significantly.
7. Promotional Partner Content
When you collaborate with guests, sponsors, or other podcasters, screen recording creates shareable promotional assets for everyone involved.
Partnership content ideas:
- Record your guest’s profile on your podcast with key quotes
- Screen record cross-promotional posts about collaboration episodes
- Create montages of multiple episode features
Here’s an overlooked advantage: screen recordings of collaborative content are often shared by everyone involved, which naturally expands your reach without any extra effort.
Best Practices for High-Quality Screen Recordings
Creating clean, professional screen recordings requires a bit of preparation. Here’s how to ensure your recordings look and sound great.
Prepare Your iPhone Screen
Before you hit record:
Clean up your home screen: Remove apps you don’t want visible, organize icons, hide anything distracting. Your viewers will judge your entire podcast by how organized your phone looks.
Enable Do Not Disturb: Swipe down from top-right, tap the crescent moon icon. This prevents notifications from appearing during recording.
Adjust brightness: Make your screen bright enough to be clearly visible. Tap the brightness slider in Control Center and set it to 75-100%.
Check battery: Screen recording drains battery faster than normal use. Start with at least 50% charge or plug in your iPhone.
Optimize Audio Quality
Audio makes or breaks screen recordings, especially for podcasters who understand the importance of sound quality.
Use your microphone wisely: The built-in iPhone mic is decent, but recording in a quiet room dramatically improves quality. Record in the same space you’d record podcast audio.
Consider external microphones: For professional-quality screen recordings, connect a lavalier mic to your iPhone using the headphone adapter. This captures much clearer narration.
Position your iPhone carefully: If using the built-in mic, keep your mouth 6-12 inches from the phone. Too close creates plosives, too far sounds hollow.
Test audio first: Record a 10-second test, play it back, and verify your voice is clear before recording your actual content.
When recording important tutorial content, it’s helpful to do a quick audio check by speaking a few sentences with strong P’s and T’s to catch any issues before the real take.
Frame Your Content
Even though you’re recording your screen, framing matters for the final video.
Portrait vs. landscape: For social media (Instagram, TikTok), hold your iPhone vertically. For YouTube or website embedding, landscape works better.
Safe zones: Keep important information (text, buttons, key visuals) in the center 60% of your screen. The edges can get cut off when posted to some platforms.
Text readability: If showing text-heavy content (show notes, descriptions), zoom in or use larger text sizes so viewers on phones can read it.
Important UI elements: Make sure buttons you tap or menus you open are clearly visible. Move slowly so viewers can follow along.
Keep Recordings Focused
Attention spans are short, especially on social media. Respect your viewers’ time.
Plan what you’ll show: Script or outline your recording before you start. Know exactly which apps you’ll open and what you’ll demonstrate.
Practice run-throughs: Do a practice recording without capturing it. This helps you work out the timing and flow before the real take.
Move slowly and deliberately: Take your time tapping buttons and navigating menus. What feels slow to you looks normal to viewers. Rushing creates confusion.
Target 60-90 seconds: For social media content, keep screen recordings under 2 minutes. Longer tutorials can be 3-5 minutes, but anything beyond that should be trimmed in editing.
Advanced Techniques for Content Creators
Once you’ve mastered the basics, these advanced strategies will level up your screen recording game.
Recording with External Microphones
The built-in iPhone microphone works for casual content, but podcast creators know better audio is always worth the effort.
Compatible microphone options:
- Lightning-connected lavalier mics (like the Rode SmartLav+)
- USB-C mics for iPhone 15 and newer models
- Wireless Bluetooth mics (though these may have slight latency)
Connection methods:
- Plug your microphone into your iPhone’s port
- iOS should automatically detect and switch to the external mic
- Test by recording a few seconds and playing it back
- If it doesn’t work, check Settings → Accessibility → Audio/Visual → Call Audio Routing
Audio quality improvements: External mics reduce background noise, provide consistent levels, and sound dramatically more professional than built-in mics. If you’re creating tutorial content or promotional videos regularly, investing $50-100 in a decent mic is absolutely worth it.
Multi-Camera Setups
Sometimes you want to show both your screen and yourself talking. This requires a bit more coordination but creates more engaging content.
Recording yourself separately: Use another iPhone, iPad, or camera to record yourself while screen recording. Then combine the two videos in editing software later.
Syncing recordings: Clap or make a sharp sound at the start of both recordings. This gives you a visual and audio spike to align the clips in editing.
Editing multiple angles: Apps like iMovie (free), LumaFusion ($30), or CapCut (free) let you layer your screen recording with your face cam video.
This setup works great for reaction videos where you screen record listener comments or reviews while showing your genuine response.
Batch Recording Content
Efficiency matters when you’re running a podcast and creating supplementary content. Batch recording saves time.
Plan your recording session: List out all the screen recordings you need (tutorial, promo, behind-the-scenes, etc.) and record them all in one sitting.
Record multiple takes: Do 2-3 versions of each recording. It’s easier to choose the best one later than to set everything up again.
File naming and organization: After recording, immediately rename your videos in Photos with descriptive names: “Subscribe Tutorial Take 1”, “Episode 50 Promo”, etc.
Content calendar integration: I like to batch record 4-6 screen recording videos at once, then schedule them out over the next 2-3 weeks on social media. This ensures consistent content without constant setup.
Integrating with Editing Software
Raw screen recordings are good, but edited screen recordings are great. Here’s how to enhance them.
Exporting to editing tools: From Photos app, tap Share → Save Video to export your screen recording. Then import it into your podcast editing software or video editor.
File format considerations: iPhone screen recordings save as .MOV files, which work with most editing apps. If you need MP4, use a converter like HandBrake (free) or export from your editing software.
Adding enhancements:
- Trim awkward pauses or mistakes
- Add text overlays highlighting key information
- Include your podcast logo or intro/outro cards
- Layer in background music or episode audio clips
- Add zoom effects to emphasize important details
Workflow optimization: Establish a consistent editing template. Same intro style, same text fonts, same outro. This makes batch editing much faster and creates brand consistency across all your screen recording content.
Troubleshooting Common Issues
Even with proper setup, you might encounter problems. Here’s how to fix the most common screen recording issues.
Screen Recording Button Missing
If you don’t see the record button in Control Center:
- Open Settings → Control Center
- Scroll down to “More Controls”
- Find Screen Recording and tap the green + icon
- The button should now appear in Control Center
If it’s still missing:
- Restart your iPhone (hold power button, slide to power off, turn back on)
- Update iOS to the latest version (Settings → General → Software Update)
- Check if Screen Time restrictions are blocking it (Settings → Screen Time → Content & Privacy Restrictions)
No Audio in Recording
Your screen recording plays back, but there’s no sound. Here’s the fix:
For voiceover narration:
- Make sure you pressed and held the Record button (not just tapped)
- Verify microphone icon was ON (red) before starting
- Check if microphone permissions are enabled (Settings → Privacy → Microphone)
- Test with a simple recording to see if your mic works at all
For system audio: Many apps (music streaming, video players) don’t allow their audio to be captured due to copyright protection. This is by design and can’t be bypassed.
For external mics: iOS will instantly switch to your external mic. If you hear nothing, double-check that the mic is plugged in securely, has microphone permissions (Settings → Privacy & Security → Microphone), and works in another app like Voice Memos
Black Screen or Blank Recordings
You recorded something, but the playback is just a black screen.
Causes and solutions:
- Protected content: Apps like Netflix, Hulu, and some banking apps block screen recording. You’ll see a black screen when recording these apps. This is intentional and can’t be fixed.
- App permissions: Some apps require permission to be recorded. Check app settings or iOS Settings → Privacy → Microphone
- Screen brightness too low: If your screen was dimmed or turned off during recording, the video will be dark. Keep screen active and bright.
Recording Stopped Unexpectedly
Your recording ended before you wanted it to.
Common causes:
- Low battery: iPhone stops recording at about 10% battery to preserve power. Charge your phone or start with more battery.
- Low storage: Screen recordings need space. Check Settings → General → iPhone Storage. If you’re under 1GB free, delete some files or photos.
- Phone call interruption: Incoming calls automatically stop screen recording. Enable Do Not Disturb before important recordings.
- Recording time limits: iOS doesn’t have a hard limit, but extremely long recordings (30+ minutes) can fail. Keep recordings shorter and combine them later if needed.
Poor Audio Quality
Your voice sounds muffled, echoey, or has background noise.
Quick fixes:
- Record in a quiet room: Background noise is amplified by iPhone mics. Use the same quiet space you’d use for podcast recording.
- Get closer to the mic: Position your iPhone 6-8 inches from your mouth for clearer narration.
- Use an external microphone: Built-in mics have limitations. A $50 lavalier mic dramatically improves quality.
- Avoid fans and AC: Turn off air conditioning, fans, and other constant noise sources before recording.
Best iPhone Screen Recording Apps for Podcasters
While the native iOS screen recording works great, third-party apps offer additional features that content creators might need.
Native iOS Screen Recording
Pros:
- Completely free
- Built into every iPhone (iOS 11+)
- Simple, no learning curve
- Reliable and stable
- Integrates with Photos app
Cons:
- Basic features only
- No in-recording editing
- No drawing or annotations during recording
- Limited export options
Best for: Most podcasters creating straightforward promotional content, tutorials, or social media posts. If you’re just getting started with screen recording for your podcast, the native tool is absolutely sufficient.
Third-Party Apps Worth Considering
For podcasters who need advanced features, here are apps that add genuine value:
Record It! Screen Recorder
Key features:
- Picture-in-picture mode (add your face to recordings)
- Basic trimming and editing tools
- Reaction video mode
- Multiple export resolutions
Best for: Podcasters who want to combine screen recording with their face cam for more engaging tutorial content.
Price: Free with in-app purchases, $5-10 for pro features
TechSmith Capture
Key features:
- Direct integration with Camtasia editing software
- Cloud sync across devices
- Trim and clip tools
- Easy sharing options
Best for: Creators who already use Camtasia for video editing and want seamless workflow integration.
Price: Free (pairs with Camtasia subscription)
DU Recorder
Key features:
- High-quality recording up to 1080p
- Live streaming capabilities
- Video editing suite included
- No watermarks on free version
Best for: Podcasters who also livestream or need a complete recording-to-editing solution in one app.
Price: Free with ads, premium options available
When to Use Third-Party Apps vs. Native
Stick with native iOS screen recording if you:
- Just need simple screen captures
- Plan to edit in separate software anyway
- Want the most reliable, crash-free recording
- Prefer fewer apps cluttering your iPhone
Use a third-party app if you:
- Need picture-in-picture face cam overlay
- Want to draw or annotate during recording
- Require custom resolution or frame rate options
- Need advanced editing features immediately after recording
For most podcast creators, the native screen recording tool handles 90% of use cases. Only upgrade to a third-party app when you have a specific feature requirement the built-in tool can’t meet.
Using Screen Recordings in Your Podcast Marketing Strategy
Screen recordings aren’t just one-off pieces of content. They’re part of a broader strategy to grow your podcast audience.
Content Calendar Integration
Plan screen recordings into your regular content schedule:
Weekly rhythm example:
- Monday: Share behind-the-scenes screen recording of episode prep
- Wednesday: Post tutorial or tip using screen recording
- Friday: Celebrate weekly stats with analytics screen recording
This creates consistent touch points with your audience beyond just episode releases.
Repurposing Across Platforms
One screen recording can fuel content for multiple platforms:
- Full video → YouTube (keep full 2-3 minutes)
- Trimmed clip → Instagram Reels (cut to 30-60 seconds)
- Best moment → TikTok (pull 15-30 second highlight)
- Screenshots → Twitter/X thread (grab 3-4 still frames)
- Embed → Blog post or email newsletter
When I create a screen recording tutorial, I always plan how it will be sliced up for different platforms before I even start recording. This maximizes ROI on the time invested.
Video Podcast Supplementary Content
If you’re creating video podcasts, screen recordings make excellent B-roll footage:
- Cut to screen recordings when explaining apps or tools
- Show your podcast analytics while discussing growth strategies
- Display listener questions from social media during Q&A segments
- Demonstrate research process by showing browser tabs and note-taking
Private Podcast Tutorial Videos
For creators offering private podcasts or premium content, screen recordings are essential for onboarding:
- Record the complete signup and access process
- Show how to add private feeds to podcast apps
- Demonstrate exclusive features only paying members get
- Create troubleshooting videos for common access issues
Multi-Platform Distribution Strategy
Your screen recordings should reach listeners wherever they consume content:
YouTube Shorts: Perfect for 60-second screen recordings. Castos’s YouTube republishing feature can automatically distribute your content to YouTube, making it easy to maintain a presence on the world’s second-largest search engine.
Instagram: Use Reels for vertical screen recordings. Stories for behind-the-scenes content. Grid posts for tutorial sequences.
TikTok: Screen recordings perform surprisingly well on TikTok, especially tutorials and “day in the life” content showing your podcast workflow.
Email newsletter: Embed screen recording videos in your newsletter to show subscribers how to leave reviews or access bonus content.
How Screen Recordings Support Audience Growth
Screen recordings specifically help with podcast growth by:
- Reducing friction: Show exactly how to subscribe, removing confusion that prevents conversions
- Building credibility: Real screenshots of reviews and downloads prove social proof
- Creating shareable moments: Quick, engaging video clips are more likely to be shared than static images
- Improving retention: Tutorial content helps existing listeners engage more deeply with your show
- Expanding discoverability: Video content on YouTube and TikTok reaches people who might never find your audio-only podcast
Conclusion
Screen recording on iPhone can be a powerful content creation tool that helps podcast creators connect with audiences in new ways.
You’ve learned how to set up and use iPhone screen recording, from the basic Control Center setup to advanced techniques with external microphones. More importantly, you’ve discovered seven specific ways podcasters use screen recordings to grow their shows: creating trailer videos, recording behind-the-scenes content, producing tutorials, making social media teasers, sharing analytics, demonstrating app features, and collaborating with partners.
The key takeaways:
- Screen recording takes less than a minute to set up and is completely free
- Adding voiceover narration transforms simple recordings into valuable tutorials
- Vertical recordings (9:16) are perfect for Instagram, TikTok, and YouTube Shorts
- Planning and preparation create professional results even with the built-in tool
- One screen recording can be repurposed across multiple platforms
Start simple: record one “How to Subscribe” tutorial this week and post it to your Instagram Story. You don’t need perfect equipment or advanced editing skills. Your listeners will appreciate the guidance, and you’ll start seeing how screen recordings fit into your broader content strategy.
As you create more screen recordings, you’ll develop your own workflow and discover which types of content resonate most with your audience. The podcasters who consistently use screen recording report better engagement on social media and fewer “how do I subscribe?” messages in their DMs.
Ready to take your podcast content to the next level? Start your 14-day free trial with Castos to access professional hosting, unlimited storage, and features like YouTube republishing that automatically distribute your video content to reach audiences everywhere.
Your iPhone is already a content creation powerhouse. Now you know how to use it.


