Sitting down to record your podcast for the first time can be a daunting task. For a detailed look at how to record a podcast, we gathered everything you need to capture your first episode. From planning out what you’ll talk about to making sure you record high-quality sound, this guide is what you need to confidently record the perfect podcast content from the start.
Action
Read to start your own podcast? Learn the nitty-gritty details of starting your own show in our comprehensive guide. Learn how to start a podcast.
The Best Way To Record A Podcast In 6 Steps
Understanding how to record a podcast is paramount to producing a high quality podcast. Sitting down to capture episode number one will introduce a few variables you may not have thought of at the start. Beginner hosts will have to answer a few extra questions when starting out to streamline the recording process for future episodes.
You’ll start with planning what to talk about, researching the episode’s topic and defining which points you want to cover. Then you’ll move to finalizing your equipment and software tools, a process you only need to set up for your first session. Once decided, it’s time to move on to the recording session by practicing microphone techniques, configuring the right audio settings, then finally capturing an episode.
To help you feel confident going into your first recording, follow our straight-forward six step guide for how to record a podcast. Let’s go!
1. Research the episode’s topic
Before you actually sit down to record, step one is planning what you’ll talk about. With your ideal listener avatar in hand, brainstorm a few themes that would pique their interest. A podcast’s first episode is the perfect opportunity to set up the rest of the series and grab the audience’s attention.
For example, if your show focuses on a little known but incredible historical event, the first episode can introduce the setting and people involved. Then allude slightly to the future climax enticing the audience to listen in the future to find out what happens. It’s a great way to set up the classic three act podcast structure that’s perfect for telling stories.
For co-hosted shows, the first episode can establish your chemistry so pick content you both feel comfortable talking about for a more natural flow. Interview style podcast hosts should take time to research their guests in detail, from understanding their credentials to checking out the last few interviews they gave. This will help you create a unique set of questions when you write out your script in the next step.
2. Write out a script and interview questions
Whether a host is recording solo, with a co-host, or interviewing a guest, it’s a best practice to write down a framework of the episode’s content. A podcast script can be written word-for-word or be a general outline depending on the show’s format, choose the best method for you. Staying on topic is important to creating engaging podcast content so give yourself a leg up by spending time on this step.
For new podcasters, we don’t suggest sitting behind the mic for the first time without any plan of what you want to say for two big reasons. The first concerns the quality of the episode’s content. Every podcast contains specific segments like an intro and calls-to-action that you’ll want to record during the session. Without a script, it’s easy to forget these important pieces and force you to jump back in the studio later on to finalize the episode. Stay efficient and write them down.
The second big benefit of a podcast script is it allows those who are recording for the first time to focus on technique. Talking into a microphone requires skill as does speaking in an even pace and avoiding abnormally altering your voice. With so many things to think about, do yourself a favor and remove the stress of figuring out what to say.
3. Set up your equipment and recording space
In order to record a podcast episode, you’re going to need some equipment. The easiest set ups include a microphone and headphones but there are a few additional accessories that will improve your sound. You could reference countless “best of” lists for an overwhelming amount of recommendations for the best stuff. Or you could check our cut-to-the-chase guide for the top podcast equipment set ups and save yourself some time.
Once you’ve ordered and received the perfect mic, turn your attention to the space where you’ll record. Many podcasters opt to set up a home studio in a spare room when they’re just starting out and this is a great option. But beware, not every space is created equal. There are important considers to take into account when choosing where to set up.Think about a room’s size and shape and the amount of noise inside and outside that will be picked up by the mic. Take care to avoid high-traffic areas in your home or the place closest to the noisy neighbor. Then add big furniture pieces like bookcases, couches, and area rugs to dampen the reverberation and echos when you start recording.
4. Choose a recording software and set your levels
After finalizing your home studio’s set up, you’ll need some recording software. It’s likely you’ll do some local recording (by yourself or with other people in the same room) or remote recording (with people who are somewhere else in the world). You’ll want to have software on hand for both situations.
Audacity is a great choice for beginners and we’ve rounded up five other podcast recording software options to fit any situation. If you’re recording your episode alone, you can do it all on a single track. But if you have a co-host or guest, you’ll want to record on multiple tracks. This will give you the most flexibility during editing
Once you choose a software, it’s time to fine tune the recording settings to ensure you capture high-quality sound. This is where you want to check and set your input levels. Start by speaking in a voice slightly louder than normal and set that level about halfway up the meter, typically this will be -18dB to -20dB. When you start recording, your normal speaking voice will be within this range but also gives you some headroom when you need move into a louder voice for emphasis.
The main component to remember is to avoid going into the red (above 0dB) as you’re recording. This will result in a distorted final audio file that is difficult to fix during the editing process. Similarly, be weary of setting your input level too low off the bat. It’ll be difficult to hear your voice in the final recording requiring you to increase the level during editing. This often makes a room’s ambient noise more noticeable for a less than desirable listening experience.
5. Practice proper recording techniques
Capturing polished audio takes practice so before you start recording, review and practice a few tips to capturing high-quality sound. Most forget to warm up their vocal cords before diving into an hours long session or ignore spot checking their audio only to find an issue too late. Seasoned pros to beginners alike can benefit from consistently monitoring their microphone technique. The general rule of thumb is to consistently stay about two fingers length away from the pop filter for the entire length of the session.
Refining and focusing on your recording approach will dramatically improve the resulting quality of your audio and save you time in the editing process.
6. Relax and hit record
The last step is finally hitting the little red button. You’re behind the mic with proper posture, script in hand with a glass of water near by, and are finally ready to start episode one. Relax and have fun, podcasting is about sharing a new voice with the world and expressing your creativity.
If you’re nervous, remember your recording isn’t permanent. It’s not like speaking publicly in front of an audience. If you it doesn’t go well the first time around, you can always adjust during editing or record it again.
Oh, and if you hate the sound of your voice, you aren’t alone. Everyone does at first.
Podcast Recording Best Practices
While every show is different, there are common best practices among popular podcasts that you can adopt for your show. From episode duration to publishing frequencies, ahead are the average characteristics of today’s podcasts.
However, we urge you to take each best practice with a grain of salt. Use these as a starting point but view each suggestion with your own show’s content in mind. It’s always best to go with the settings that will offer your listeners the most value.
How long should my podcast episode be?
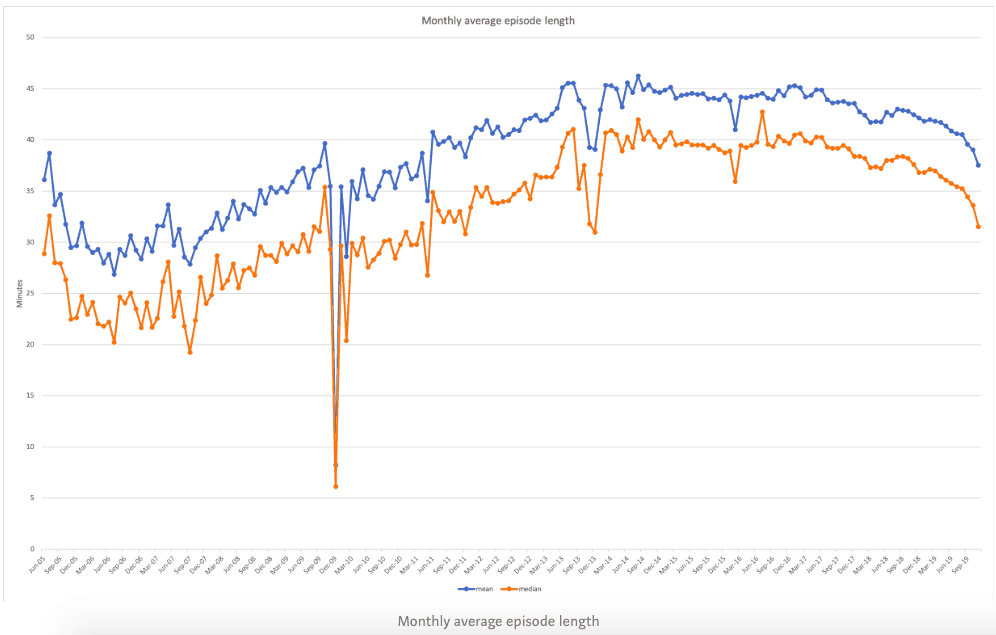
Popular podcast agency, Pacific Content, recently analyzed over 637K podcasts for their durations. They found the median length is 36 minutes and 34 seconds based on 18M episodes. They also found podcasters are gravitating towards shorter episodes, shown by the downward trend line below.
Which day of the week should I publish new podcast episodes?
Buffer, a social media marketing tool, analyzed the top 25 shows on Apple Podcasts for their typical publishing schedules. They found 60% of these podcasts posted new episodes during the first half of the week, with Tuesday as the most popular individual day.
How often should I publish new episodes?
The two most popular publishing frequencies are weekly and biweekly. Each of these cadences allow you to sustainably produce quality episodes and have enough time to market them to your target audience.
It’s no secret that podcasting takes time and resources. When figuring out which publishing schedule is best, go with the timeline that strikes a balance between satisfying your audience’s listening habits and the realistic workload that goes into producing new content.
Keeping up with a consistent publishing frequency is important to a show’s growth and a host’s ability to avoid “podfade”. Don’t jeopardize creating quality content just to stick to these most popular cadences.
How To Record A Podcast With Audacity
Audacity is a popular recording software among podcasters and for good reason. It’s free, has a relatively easy learning curve, and has all the features you’ll need to capture professional sounding audio recordings.
To help you get started, follow along with the instructions and video tutorial below:
- Plug in your external microphone first.
- Open Audacity from the Applications folder.
- Choose your microphone input from the dropdown menu next to the Microphone icon. You may need to restart Audacity for your microphone to appear in the dropdown if it wasn’t plugged in.
- Set your volume controls next to the Speaker icon. Once you start recording, you’ll see the volume meters appear in the top of the dashboard.
- Hit ‘Record’ button and start recording your podcast.
How To Record A Podcast On A Mac
Both GarageBand and QuickTime allow you to record a podcast on a Mac without having to download any additional softwares. Both are simple to use and perfect for podcasting. Use these simple tutorials to get started.
How to record a podcast using GarageBand
Follow along with Resonate Recording’s 30 minute video tutorial on how to record a podcast using GarageBand.
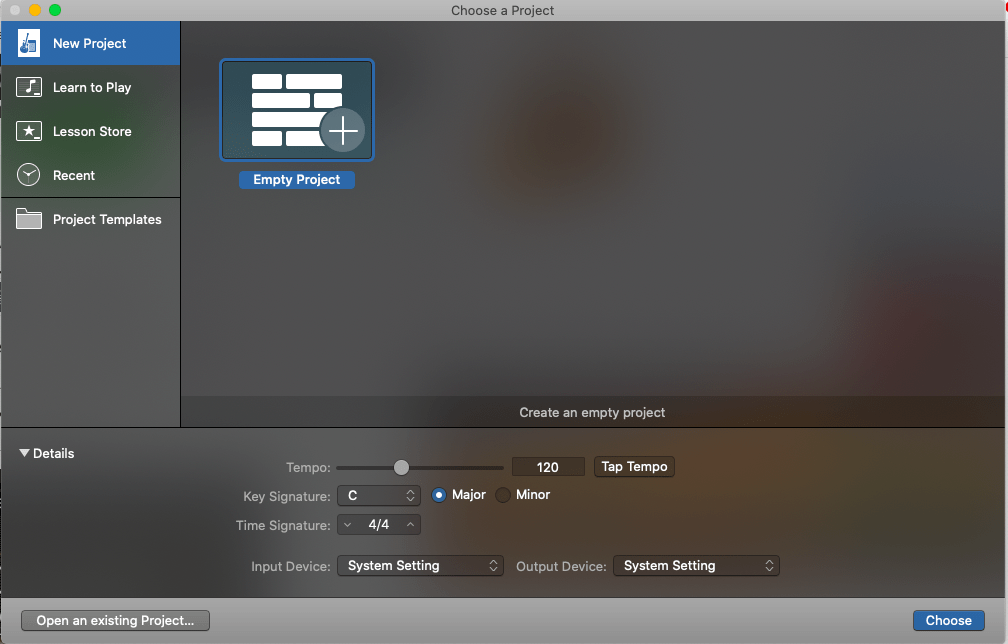
- Open the GarageBand application from the Applications folder.
- Choose ‘New Project’ and click on ‘Details’ to set your input and output device. Then click ‘Choose’.
- Set up a new folder on your computer to save all audio files in one place. This will archive your recording sessions so you don’t lose any content!
- In the bottom left side of the dashboard, click the ‘Master’ tab and turn off all settings. Under the ‘Effects’ tab, turn off the ‘Master Echo’ settings.
- Toggle back to the ‘Tracks’ tab and create separate tracks for your intro, outro, music, and episode content.
- Go to ‘Recording Settings’ to set the volume levels of each track. Be aware of the input monitor as you test the levels, you want to avoid the red portion of the meter.
- Toggle on the ‘Input Monitoring’ icon for the track you want to record first. Finally, hit ‘Record’ and start capturing your first episode.
How to record a podcast using QuickTime
QuickTime is another standard recording software that’s installed across all Mac devices. It has less bells and whistles than GarageBand so as there’s almost zero learning curve to get started.
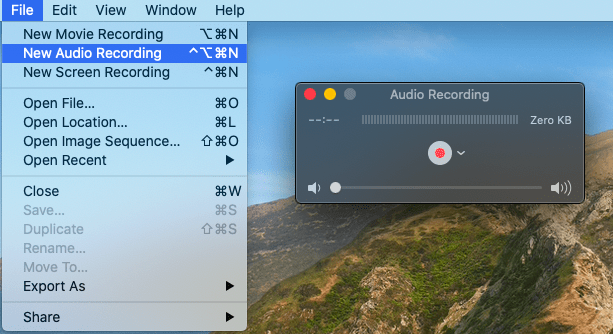
- Open the QuickTime application from the Applications folder.
- Click ‘File’ > ‘New Audio Recording’
- Click the arrow to the right of the ‘Record’ button to change the microphone and recording quality. We recommend using the ‘Maximum’ quality setting.
- Hit the ‘Record’ button and start capturing your first episode.
- To export, go to ‘File’ > ‘Export As’ and choose ‘Audio Only’.
Summary
Taking the steps to create a podcast is an exciting time with it all starting to feel real when you record the first episode. Many feel nervous getting behind the microphone and initially hate the sound of their voice but over time, recording podcast episodes gets easier and easier.
Keep this six step guide on how to record a podcast handy if you’re just starting out. We hope it helps you feel confident and prepared going into your first session. Once you have a few episodes under your belt, you’ll be surprised at how efficient your recording process becomes.


Comments are closed.