What are the Best Zoom Settings for Podcasting?

Castos is a participant in the Amazon Services LLC Associates Program. We may earn commissions from your purchases on Amazon.com, though at no cost to you.
Zoom is one of the most popular podcast recording tools because it’s simple and everyone has it. That accessibility is a big deal. Unfortunately, Zoom’s default settings compress audio and diminish its quality, but you can improve it with some tweaks. In this guide, we explain a series of steps to enable the best Zoom settings for podcasting and produce the best audio.
Tip
Need help recording your podcast on Zoom? Our step-by-step Zoom podcasting guide walks you through the process of using Zoom to record your podcast.
Step 1: Download and Install Zoom
Your first step is to download and install Zoom. Fortunately, it has apps for any device: PCs, Macs, iOS, and Android. Grab whichever app is right for you at Zoom.us. You’ll need to create an account before downloading.
Which plan should you choose? For most podcasters, the Fee plan is sufficient. However, recordings are limited to 40 minutes, so you’ll need to grab the Pro plan if you intend to record episodes that are longer. The Pro plan also unlocks cloud recording and transcriptions.
Step 2: Select Your Input and Output Devices
While it’s true that the microphone and camera that come installed on your computer or laptop are capable of capturing audio and video, if you want to produce a quality show and grow your audience, it’s important to use better recording gear.
We strongly encourage you to invest in a podcasting microphone. You don’t have to spend a lot to drastically improve your audio quality.
In fact, one of our favorite podcasting mics is the Samson Q2U, which only costs about $70. If you’re willing to spend a bit more, the Shure SM7B is a superb pick. (If you watch any video podcasts, you’ll often see a Shure mic in frame.)
Tip
For more device recommendations, check out our comprehensive guide on podcasting gear. It tells you everything you need to know about your equipment.
You’ll also need a set of headphones. Your AirPods will work, but we recommend getting something more substantial. The ability to hear yourself as you speak is a great way to improve your audio. Check our headphones guide for some options.
In Zoom, you’ll need to select your input devices in Settings > Audio. Select your mic from the drop-down menu. Then click the “test mic” button and speak into the mic to make sure it’s working properly.
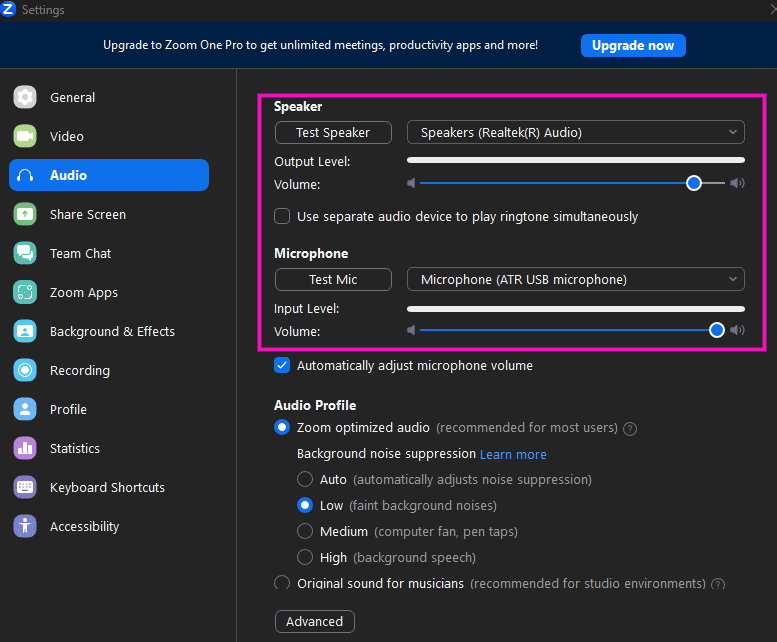
If you don’t see your mic on the list or if it doesn’t register when you speak, you may need to make changes to your OS settings or install some drivers.
Step 3: Choose Your Audio Settings
Zoom isn’t a podcasting platform, so it doesn’t come optimized for podcast audio. That said, you only have to adjust a few Zoom settings for podcasting to improve its recording functionality.
By default, Zoom compresses your audio. This makes the file smaller and easier to transfer, but it also reduces the quality. For a podcast, you want crystal clear audio, which means it has to be uncompressed.
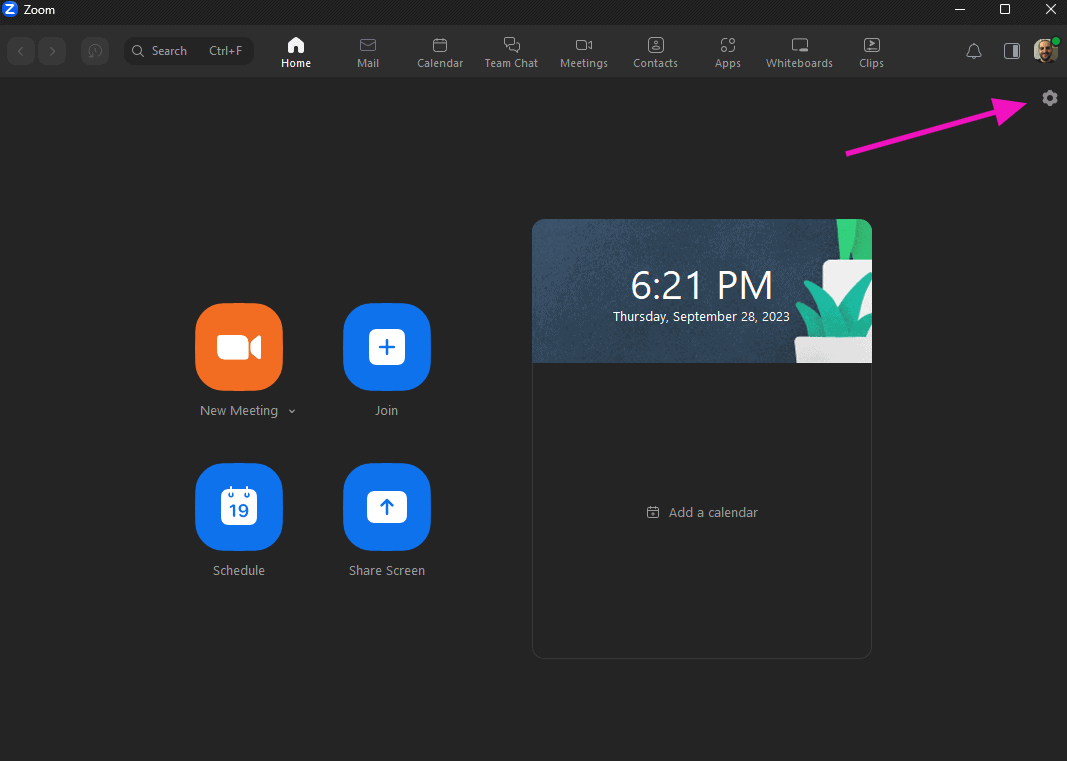
Open the Settings page by clicking the gear icon at the top right of the window.
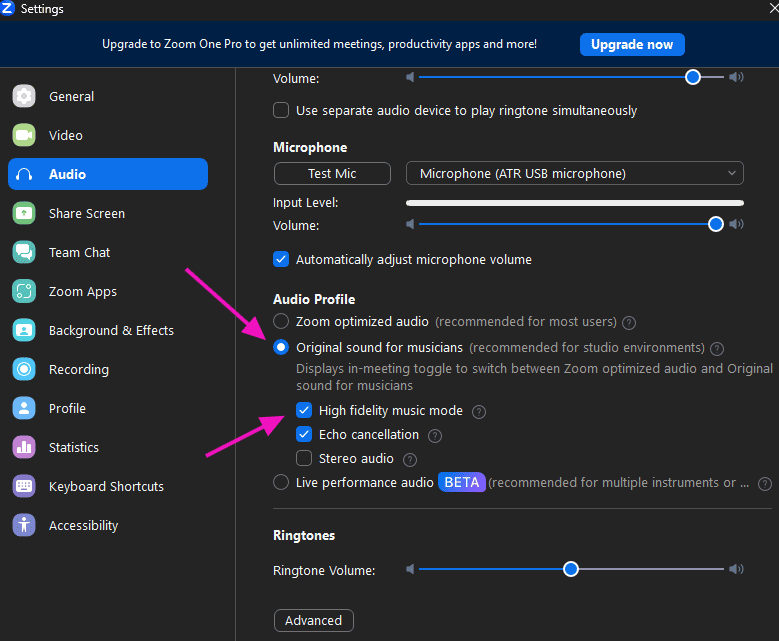
In the Audio tab, look for Audio Profile section. Set the toggle to “Original sound for musicians. Then select the “High fidelity music mode” box. These options add a toggle to the meeting dashboard that remove Zoom’s built-in audio filters so the app records your sound exactly as it is.
In the Recording tab, select “Record a separate audio file of each participant.” This puts each participant’s audio in a separate file so they can be edited independently. This is called multi-track recording or a “double ender.”
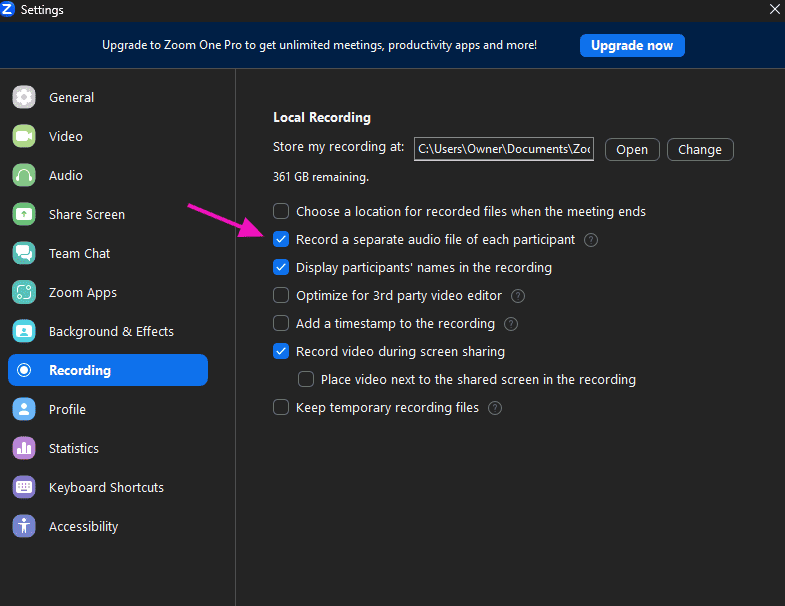
For instance, if one person’s volume is too low, separate recordings allow you to raise their volume without affecting the other speaker. If one person interrupts, you can delete their interruption without impacting the original speaker.
Unfortunately, Zoom does not offer the option to record separate video tracks. So if you record video, you get what you get.
If these settings make Zoom too sensitive for your needs, go back to the Audio tab and switch back to “Zoom optimized audio” and set the “background noise suppression” to low. Zoom will attempt to identify what is your voice and what is background noise, then slice out the noise. It doesn’t remove everything perfectly, but it definitely removes the loud stuff.
Step 4: Improve Your Recording Environment
Now that you’ve tweaked your Zoom settings for podcasting, your next step isn’t a setting in Zoom, but it’s a key way to make sure Zoom picks up the best sound. You’ll need to take some steps to optimize the space you record in.
- Make sure you won’t be disturbed. Put a sign on your door that says “Recording in Progress: DO NOT ENTER” so no one walks in or knocks.
- Record in a place with little background noise. If you can hear foot or car traffic on the street, so will your listeners.
- Surround yourself with soft surfaces like sofas, blankets, curtains, and pillows. These absorb sound so it doesn’t reflect back to your microphone.
- Ensure your internet connection is strong and stable.
- Close all unnecessary applications on your device.
- Ensure that your microphone is set up properly. Secure it with a stand or boom arm that doesn’t move and position it a few inches from your mouth.
For more detailed information about building a recording space, check our podcast studio guide.
Step 4: Perform a Test Recording
Before you start recording a podcast episode – especially if you’re interviewing a guest – it’s smart to perform a test recording to make sure everything works properly. This is critical if you’ve never used Zoom before.
You do not want to have to ask your guest to re-record an episode because you failed to use the software properly.
Performing a test is simple. Record a Zoom meeting while you talk for a bit. Do it in your recording space with your podcasting equipment. This is a good time to record your intro or outro, or any segment you intend to splice in during editing.
If your episodes involve multiple people, it’s best to perform the test with multiple people as well. This will tell you if the recording works properly and if your internet connection is sufficient.
If you’re hosting a video podcast, make sure the video feature is turned on. If it’s an audio-only podcast, turn the video feature off to improve your signal.
Step : Record with Original Sound On
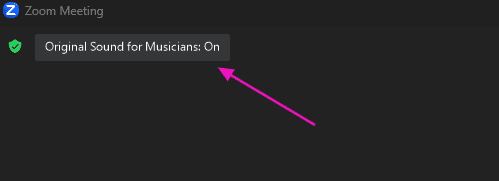
Earlier, you checked a box to “Show in-meeting option to enable original sound.” This setting made the original sound option available, but you have to toggle it on when you record.
When you’re in a meeting and ready to record, find the Original Sound option in the top left corner and toggle it to ON. Then hit the Record button to start recording.
When you’re finished recording, click Pause or Stop at the bottom. Alternatively, you can simply end the meeting. The recording will automatically download when you hit End Meeting.
Your Zoom Settings for Podcasting
Do you use Zoom to record your podcast episodes? If so, are there any settings, tips, or tools you use to raise the quality of your audio? Let us know your Zoom settings for podcasting in the comments.
Launch Your Podcast In Minutes
Castos makes launching simple with one-click setup, automatic distribution to all platforms, and professional hosting. No technical skills required.
Start your 14-day free trial