If you’re at the beginning of your podcasting adventure, you probably want to know how to record a podcast. This is the most intimidating step for many new podcasters. It’s okay if you feel nervous, but don’t let it stop you from starting your podcast. In truth, recording an episode is surprisingly easy, it just takes a bit of practice.
In this article, we’ll answer some common questions about recording a podcast. Then we’ll get into a step-by-step tutorial to help you start recording.
Where Should I Record a Podcast?
You need a space for podcast recording. You can have the best recording equipment and still produce poor audio if your space isn’t suited for podcasting.
However, your recording space doesn’t have to be a professional studio. It’s simple to make a suitable space in your home without spending a lot of money. For instance, many podcasters simply record in their closet because it’s full of soft surfaces (carpeting and clothing) that absorb sound and prevent echos.
What’s important is you have control over whichever space you use to record. You should have complete control over the ambient noise, interruptions, and reverberation. Ideally, there should be none of those things. If extra noise makes its way into your audio recording, you’ll either have to accept the bad audio or spend a lot of time painfully removing the interruptions.
If you have some money to invest, but don’t want to build a studio, you can always rent some studio time in your local area. There are lots of hire-by-the-hour studios all over the world.
Tip
For more information about your recording space, read our full guide on setting up a podcast studio.
Why Does Recording Quality Matter for Podcasts?
A study by USC and the Australian National University shows that audio quality influences your credibility. Your sound actually affects whether people believe what they hear and whether they trust the source of information.
Norbert Schwarz, a co-director of the Mind & Society Center at the USC Dornsife College of Letters, Arts and Sciences puts it succinctly: “When you make it difficult for people to process information, it becomes less credible.”
That’s not so hard to believe. Eloquent people are considered more trustworthy, regardless of the substance of their content. You’ll change the radio station if the reception is poor, even if they’re playing your favorite song. We just don’t like to listen if we can’t understand.
As you can imagine, credibility is critical for a podcast. If your listeners don’t trust what you’re saying, there’s no way they’ll keep listening. As a host, your goal is to create an imitate, long-term relationship with your listeners, but that’s impossible if they struggle (or otherwise have to exert effort) to hear your words.
Furthermore, your audio quality is important because you have a lot of competition. There are a lot of shows out there taking their audio seriously. If you don’t compete at their level, your listeners will migrate to the shows that sound pleasant in their ears. Finding a new show is as simple as hitting the BACK button in a listening app, so don’t give your listeners a reason to go elsewhere.
How Do I Plan to Record a Podcast?
Planning is, arguably, the most important part of recording a podcast episode. Without a good plan, your content will suffer. The way you plan will depend on the format of your podcast and your preferences.
For instance, if you’re hosting a solo monologue style show, you might take the time to write a complete podcast script. Non-fictional storytelling and podcast theater shows also tend to use carefully planned scripts.
If you’re hosting an interview style show, you’ll need a list of questions and discussion points for your guest. You can’t control exactly what your guest says (although you can help them out by showing them your questions ahead of time), so you’ll need to rely on your conversation skills.
Shows with multiple hosts or panels of guests tend to rely on some brief notes to keep the conversation flowing. These shows also rely on strong conversation.
Furthermore, it’s smart to do whatever makes you most comfortable. Some hosts find scripts too restrictive. They get bored during the recording and often go off-script, so instead they prefer to use bullet point notes. Other hosts find comfort in carefully planned words and like to spend their time drafting the content precisely as they want it to sound.
What Equipment Do I Need to Record a Podcast?
We hear this question a lot. People want to know what to use to record a podcast. Podcast recording requires a few pieces of equipment. You don’t have to spend a lot of money, but you need some basic gear. These pieces will give your show a professional sound.
- A computer – To store and edit the recorded audio.
- An XLR or USB microphone – To pick up your words, of course!
- A mixer – To balance and combine audio signals.
- Pop filter or windscreen – To blunt your plosives (Rs, Ts, Ks, etc.)
- Headphones – To hear yourself properly.
- Mic stand/boom arm – To keep your mic at a consistent distance from your mouth.
- Acoustic treatments – To control reverb in the room and ensure good sound quality.
- Recording and editing software – To manage and optimize your files.
- Podcast hosting provider – You need somewhere to host the audio files.
Your microphone is the most important component. This is where you should spend some money. USB microphones are simple because they plug right into your computer, but XLR mics sound better.
A mixer is required if you’re using an XLR microphone or if you want to record multiple channels at the same time (like if you have a guest or two). Adding a mixer also creates a new opportunity to record live episodes with AUX features so there’s minimal post-production for the final cut.
Whether you need acoustic treatments depends on the state of your podcast recording space. If the space already prevents reverb, you don’t need treatments. But if you’re recording in a room with lots of hard surfaces, you’ll want to add treatments to prevent sound from bouncing around.
Tip
For specific gear recommendations, read our full guide on podcast gear for any budget.
Can I Record a Podcast on a Smartphone?
A lot of people wonder how to record a podcast on their phone. Yes, podcast recording is possible on a smartphone, as long as it has a working microphone. You also need an audio recording app such as Alice, Easy Voice Recorder Pro, Otter Voice Notes, RecForge II, or Say&Go.
That said, we don’t recommend recording on a smartphone. The audio quality is usually poor which will reflect poorly on your brand. Some smartphones have decent microphones, but they’re no match for a proper microphone. Listeners will notice that your audio doesn’t sound as professional as other shows.
If you decide to record with a smartphone, make sure to record in a quiet place with as little echo as possible. Avoid noisy environments, like the car or public transportation. Find a reasonable distance from the mic – not too far and not too close. You may also want to invest in a detachable mobile microphone to boost your audio quality.
What Software Do I Need to Record a Podcast?
If you aren’t using a digital recorder, you’ll need some recording software. This isn’t the same as editing software, though some apps offer recording and editing features in the same tool. Choosing the right tool for your needs takes a bit of time, so don’t be afraid to explore your options.
When it comes to podcast recording, you’ll either record locally or remotely.
A local recording is when you, your co-host, and any guests are all in the same room. Each person speaks into their own microphone and is recorded on a separate track. Tracks are stored locally in a central location, like a digital recorder or computer that’s also in the room.
Here are our recommendations for local recording software:
If your podcast features call-in guest interviews or if your co-host lives elsewhere, you’ll need a recording software that supports remote recordings. Skype used to be the standard, but there are better alternatives now:
Alternatively, you could use a portable recording device like the Zoom H6 or the Zoom Potdtrak to record your content. These are handheld recorders with microphone ports that are great if you record on location or if you need a “middle man” to plug an XLR mic into your computer.
How Do I Record a Video Podcast?
Like a lot of shows, you may want to capture the video element of your recording as well. These video podcasts are great for publishing on YouTube. You’re already recording, so you might as well grab the free video. In this case, you’ll need a recording software that can capture video as well. We recommend QuickTime, Riverside, or Zoom.
There are four ways to create a video element for your show:
- Static image recording – This is the easiest method. All you do is convert your podcast audio file to a video file and add a static background image to “play” as the user listens.
- In-studio recording – This is when you set up video equipment inside your recording studio to capture the conversation between the host(s) and guests.
- Remote interview recording – This is when you capture footage of multiple speakers who aren’t in the room together. The video usually shows all speakers at the same time.
- Interview & b-roll recording – This is a mixture of archival or b-roll footage over the audio recording. For example, if a guest references a movie clip, news article, or chart, you might edit that asset into the video for viewers to see.
Action
With Castos’ YouTube Republishing, you can reach your audience on the second largest search engine on the internet — YouTube. We convert your podcast audio files to beautiful-looking videos and automatically publish them to the YouTube channel and/or playlist of your choice. It’s available right inside your Castos dashboard. Set it once and forget about it. Learn more.
How Do I Record a Two-Person Podcast?
Most podcasts involve more than one person, whether that’s a co-host, an interviewee, a panel of guests, or someone else on your team participating in the recording. While it’s possible to crowd around the same microphone, this isn’t ideal for quality audio.
If all participants are in the same room, each person should have their own microphone and follow good microphone techniques. Audio should be stored on separate tracks and merged together at the end. This lets you edit each track independently to create a pleasing experience.
If some participants are in different places, you’ll need to record remotely. We strongly recommend recording as a “double ender.” This is when you record each participant separately on their own computers so you aren’t relying on anyone’s connection. The two audio files are then combined during post-production.
In this case, both parties need audio recording software on their computers. We recommend Audacity because it’s easy for everyone to use. (See our tutorial below.) Squadcast, Riverside.fm, and Zencastr are three apps that record multiple participants separately. After your recording, you can download both audio files and combine them in your favorite editing software.
If you don’t want to use the double-ender method, Zoom is an easy to use app that most people have installed already. You can record any meeting and download the single file at the end. The sound quality isn’t perfect, but the connection is reliable. Skype also has a record feature, but it has known reliability issues.
How Do I Edit a Podcast?
Editing a podcast is the next step after recording, so we won’t get into too much detail here. But editing your show can be as simple as chopping out the silences or meticulously arranging dozens of clips on a 20-channel multi-track session. Or it could be anything in between.
New podcasters typically use one or a blend of these basic editing processes:
- Minimum effective editing – This is a simple form of editing that involves two simple steps. 1) “top and tail” (cutting the parts of the recording before the content starts and after it ends without touching anything in between – it all stays in as it was recorded), and 2) minimum processing (just volume standardization).
- Macro content edit – This is a wider approach. Instead of making time consuming micro-cuts, you make macro-cuts: removing entire segments. You might remove a guest’s long rambling answer that never reached your question, or you might slice out the tangent story that doesn’t serve a purpose.
For more information on editing your show, read our full guide on editing a podcast or watch the following video.
Action
Need help editing your show? Castos Productions takes the hard work of post production off of your hands, leaving you free to grow your show and connect with your audience. Our podcast editing service is staffed by our own team of seasoned audio engineers, talented show note writers, and producers who take care of every aspect of your podcast after you record an episode. Learn more.
What’s the Easiest Way to Record a Podcast?
The easiest way to record a podcast with good audio is by using Audacity, a free audio recording and editing tool. We recommend this to all new podcasters. Follow the tutorial in the next section for a complete walkthrough.
Step-by-Step Podcast Recording Workflow
To help you understand how to record a podcast, we’re going to walk you through the process step-by-step. For this guide, we’ll use Audacity because it’s free, easy to use, and works with Windows, Mac, and Linux systems. In our opinion, this is the best way to record a podcast. If you decide to use other recording software, the process will be similar.
Step 1: Download Audacity
Audacity is 100% free to download and use. Get it here.
Step 2: Open Audacity
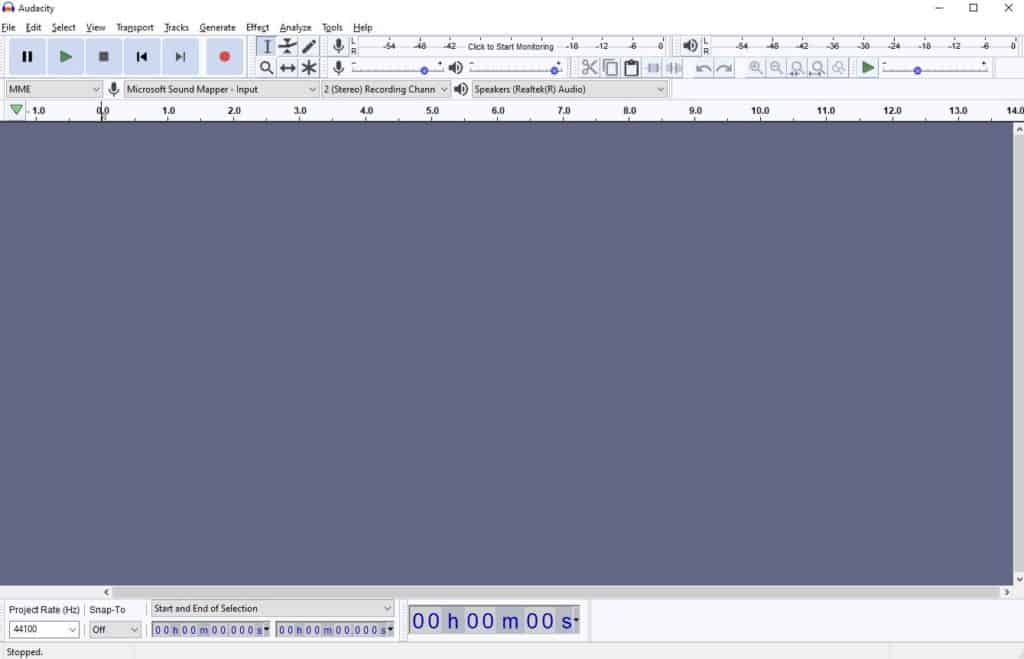
Next, open the application. You’ll see a blank workspace like this.
Step 3: Select your microphone
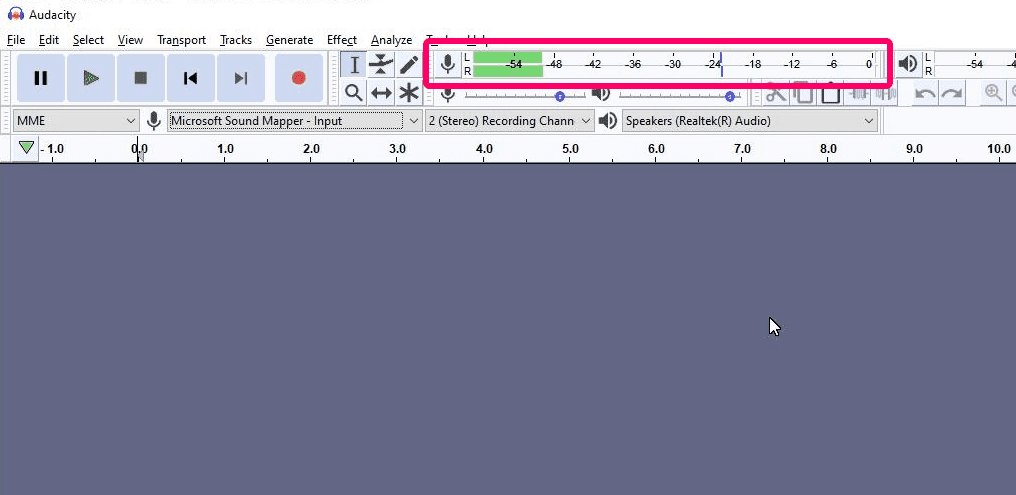
Audacity needs to know where audio will come from. It uses your built-in microphone by default (or whichever mic your operating system considers default). Select your microphone from the drop down menu in the toolbar.
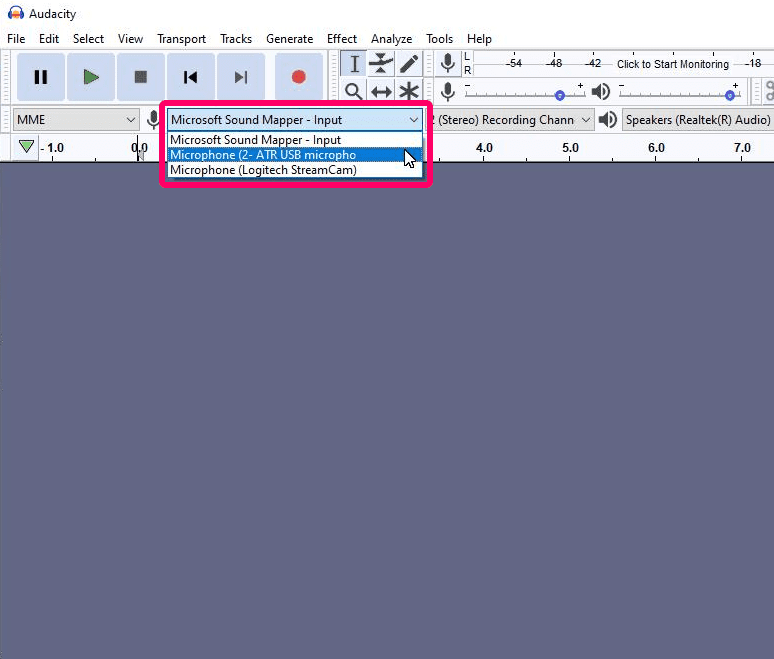
Check that your mic is working by clicking on the “recording level” bar and speaking into your mic. The bar should light up green based on your voice.
Step 3: Start recording
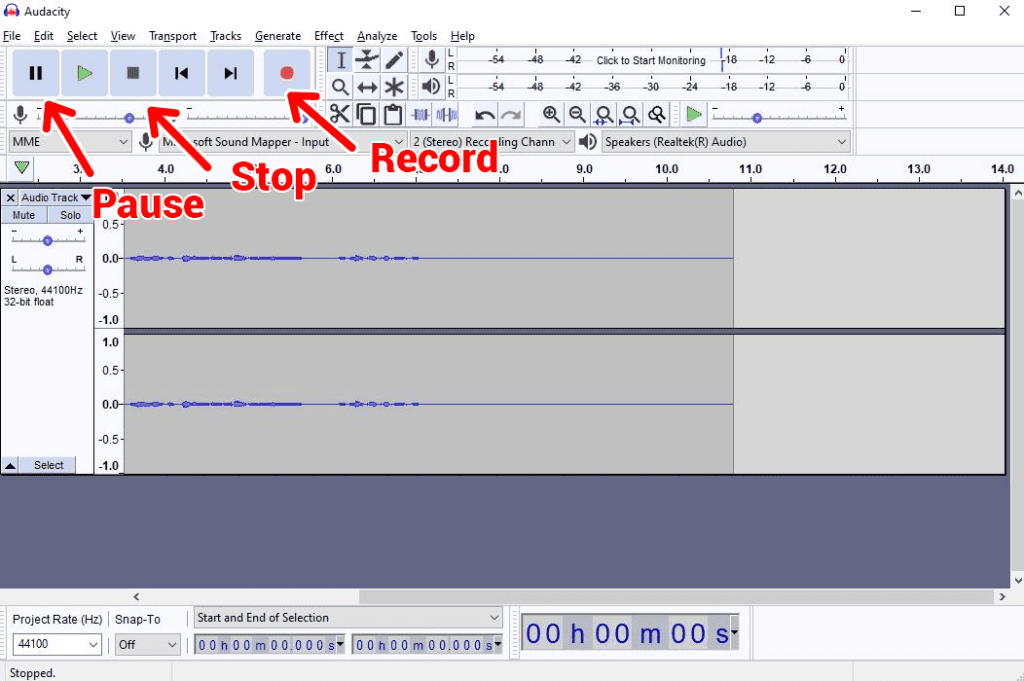
When you’re ready to record your podcast, click the record button with the red circle. If you need to take a break, click the pause button. You can pick up where you left off by hitting the pause button again.
When you’re finished, click the stop icon. If you press record again, Audacity will start a new audio track from the beginning.
Step 4: Review your recording
Want to hear yourself? Just hit the green play button. This will play your recording from the beginning. Alternatively, you can click anywhere on the track to play from that point.
Step 5: Export your podcast
When you’re finished recording, the final step is to export the file. Go to File > Export Audio. Give your file a name and choose your file type. M4A (AAC) or MP3 are the industry standard and required by most podcast hosting platforms.
If you have multiple audio tracks from stopping and starting, Audacity will ask you to mix them down into a single channel. Click confirm to continue.
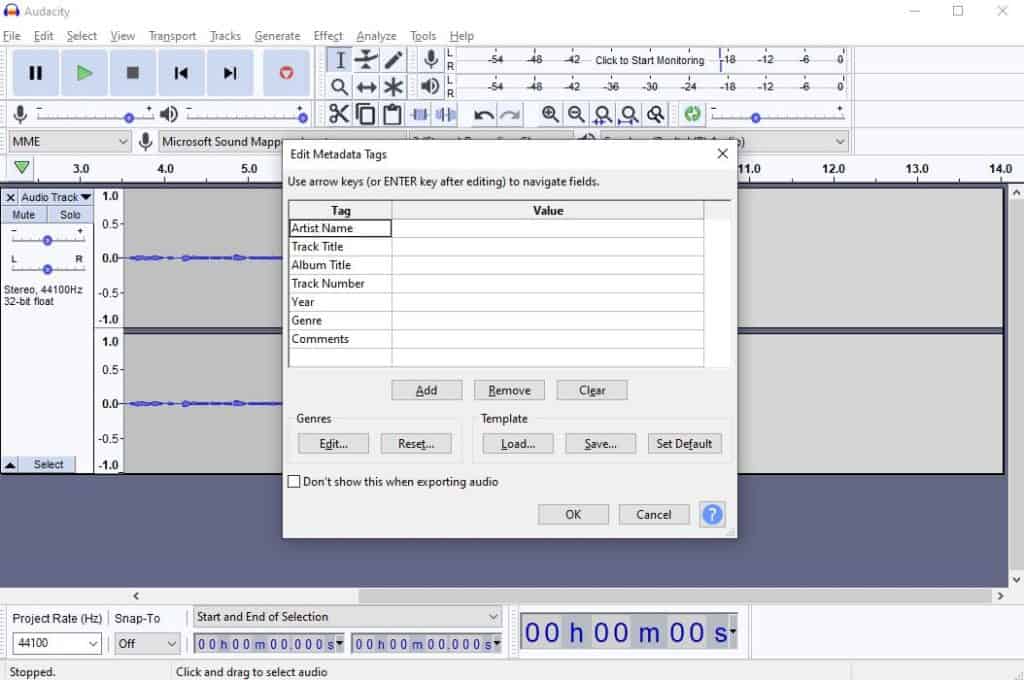
Finally, you’ll need to enter your show’s information. This is called metadata. It includes the artist, title, year, genre, and other information. Complete it as best you can.
How to Record a Podcast with Descript
Descript is one of our favorite podcasting tools. We love it so much, in fact, that we’ve built a close partnership with their company.
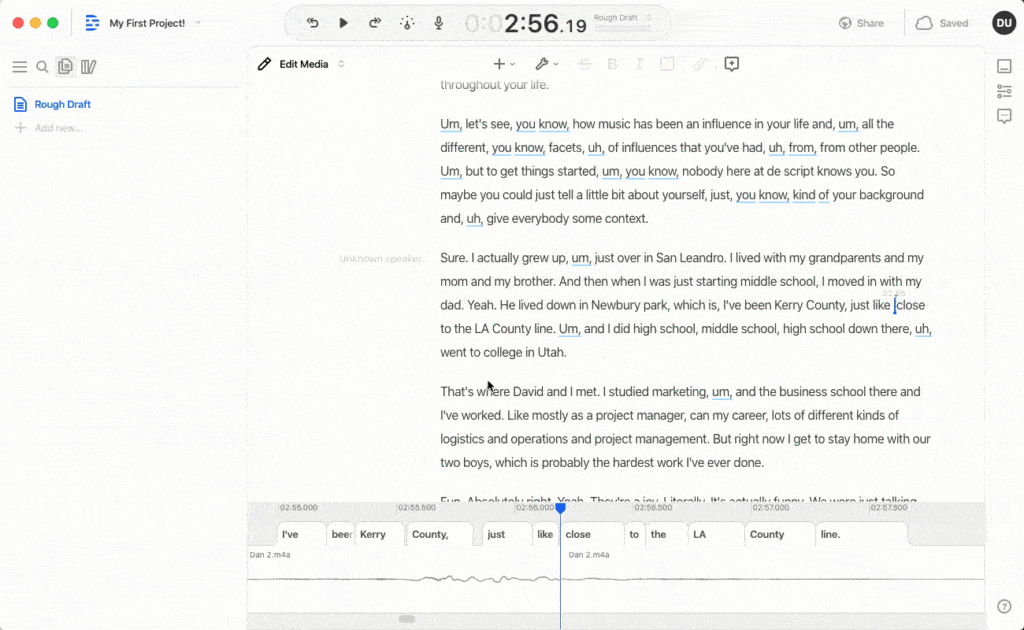
Descript is an all-in-one tool that makes editing your podcast (both audio & video!) as easy as editing a word document. Record, transcribe, edit and mix to bring your podcast to life quickly and easily. It offers some very special features.
Descipt can transcribe your dialogue as you speak. The transcription is extremely accurate. You can paste these transcriptions alongside your podcast show notes without any editing.
Descript lets you record and edit audio files just as you would in any other audio workstation. So you don’t need any other tool. If you have multiple tracks, simply drag them into a Descript project. You’ll be able to edit in both tracks separately and then combine them together.
If you aren’t comfortable behind a mic, you probably drop a lot of filler words into your content. Editing them out is painstaking, but Descript will do it for you. It has a feature called Filler Words Pro that automatically eliminates filler words, such as “like,” “um,” and “uh.”
Descript’s most innovative feature is called Overdub, which makes it so you don’t need to record at all. Simply paste in some text and Descript will produce the audio recording for you. You can use one of their stock voices or train Descript to use your own voice. There’s no trudging back into the recording studio!
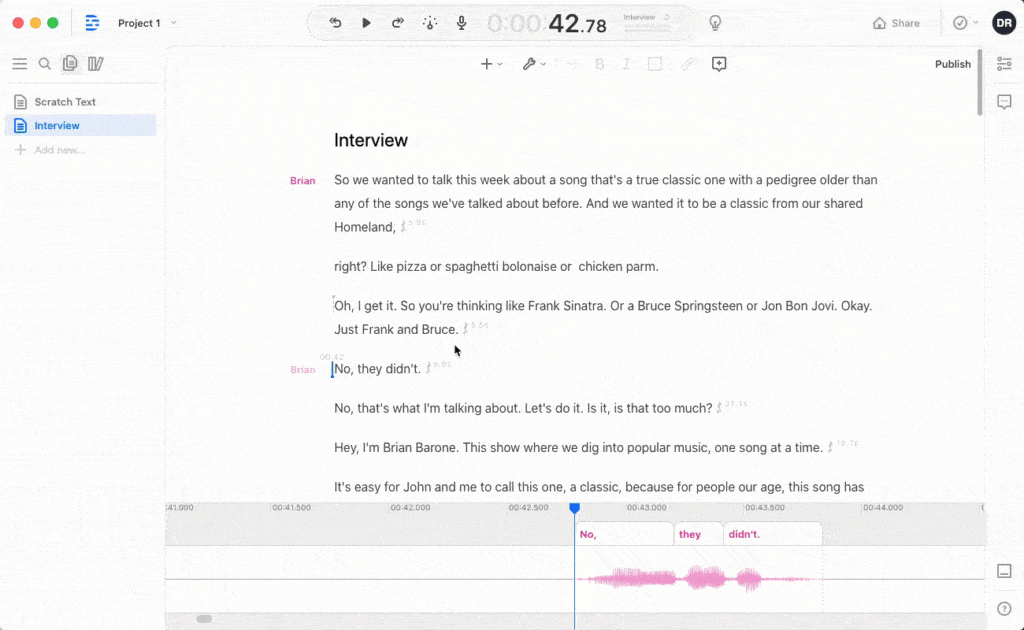
The best part is that you can publish your Descript audio right to your podcast hosting account with one click thanks to our powerful Castos/Descript integration. Once you’re done producing your audio in Descript, simply export your file to Castos. Your episode will appear in your Castos account immediately. This short video explains everything.
Action
Castos customers who are new to Descript receive one month free of their Pro plan. Learn more.
Going Forward
Congratulations! Your first podcast recording represents your biggest step into the world of podcasting. Now that you know how to record a podcast, your next steps are to edit the episode, publish it to your podcast host, and promote your show. Keep moving forward and soon you’ll have an audience who craves to hear your every word.
Do you have any tips from when you learned how to record a podcast? If so, please leave them in the comments!


