How to Record a Podcast on Zoom: Settings, Steps, and Limits

Castos is a participant in the Amazon Services LLC Associates Program. We may earn commissions from your purchases on Amazon.com, though at no cost to you.
Most podcasters I work with record their first remote interview on Zoom, and almost all of them do it wrong the first time. Not because Zoom is bad, but because Zoom’s defaults are built for a sales call, not for a show. It compresses your voice, removes what it decides is background noise, and hands you a single mixed file where your guest’s cough is welded to your sentence.
Change five settings and the same app produces audio you can publish. This guide walks through the full setup, the one recording option that matters more than all the others, and the point at which you should stop using Zoom and move to something built for podcasting.
Updated July 2026: rewritten for podcast recording rather than general meetings, with the podcast-specific audio settings, a Zoom vs dedicated tools comparison, and the defunct BlueJeans and Skype recommendations removed.
Can you record a podcast on Zoom?
Yes. Zoom records both audio and video, and on a paid plan it will save a separate audio file for every participant, which is the feature that makes it genuinely usable for interview shows.
The catch is that Zoom records the audio stream that arrives over the internet, not the raw audio sitting on each person’s machine. If your guest’s WiFi hiccups, that hiccup is in your master file forever. Tools built for podcasting avoid this by recording locally on each end and uploading afterward. That single difference is the whole case for and against Zoom, and it is worth understanding before you build a show around it.
For a weekly interview podcast where your guests are busy people who already have Zoom installed, the tradeoff usually favors Zoom. For a flagship show where audio quality is the product, it does not.
What you need before you record
- A Zoom account. Free works for solo recording and short conversations. Paid unlocks the separate-track recording that makes editing possible.
- A real microphone. Not your laptop’s built-in mic.
- Wired headphones for everyone on the call, including your guest.
- A wired internet connection if you can manage it.
- A podcast host to publish the finished file.
Step 1: Set up your Zoom account
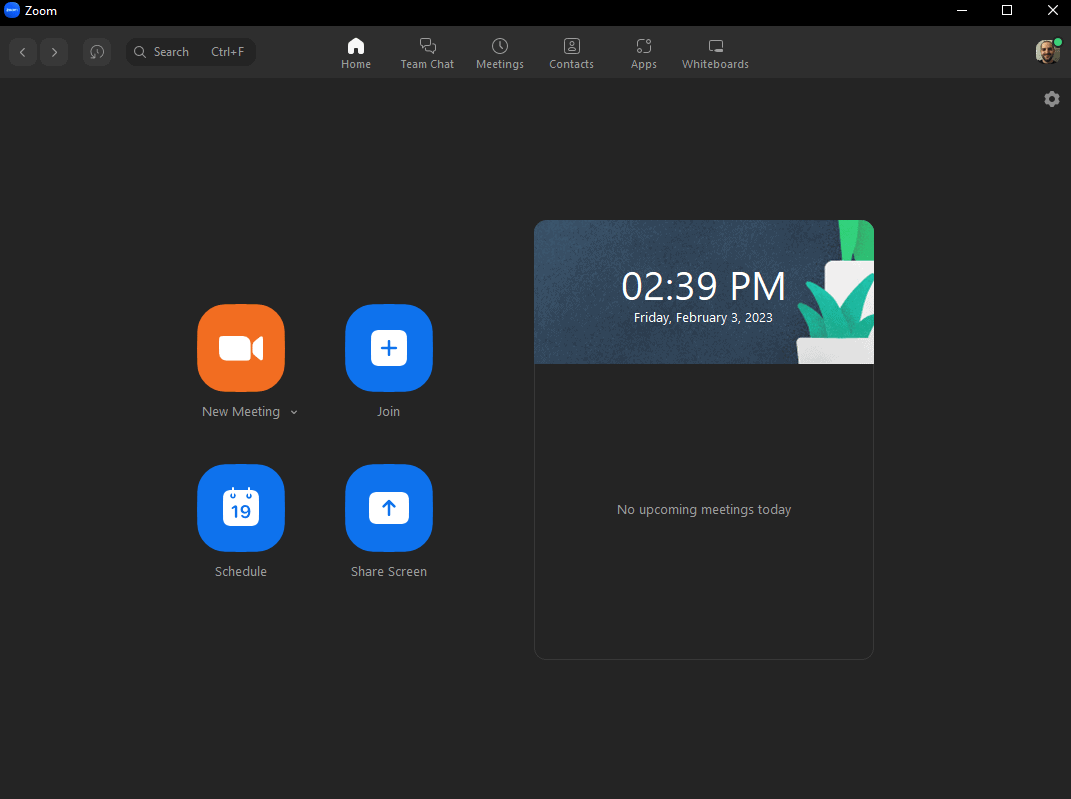
Download Zoom from zoom.us and create an account. There are apps for Windows, macOS, iOS, and Android.
Which plan you need comes down to two limits. A free account records locally to your own computer, which is fine, but group meetings cut off at 40 minutes and you cannot record separate audio tracks per participant. Both of those matter for interview shows. A paid plan removes the time cap, adds cloud recording and transcripts, and unlocks separate participant tracks.
If you record solo, or your episodes genuinely run under 40 minutes, the free plan will carry you further than most guides admit. Zoom’s pricing changes often enough that it is worth checking the current Zoom plans page rather than trusting a number in a blog post.
Step 2: Choose your microphone and headphones
The mic and camera built into your laptop can capture sound, but they will make your show sound like a conference call. This is the single biggest quality jump available to you, and it is cheaper than people expect.
One of our favorite podcasting mics is the Samson Q2U, which runs about $70. If you can spend more, the Shure SM7B is the mic you see in frame on most video podcasts. Our full podcast microphone guide covers the range in between.
Everyone on the call needs headphones too. Without them, your guest’s speakers feed their audio back into their mic, and Zoom’s echo cancellation starts chewing holes in the conversation to compensate. AirPods will do in a pinch, though the headphones we recommend will serve you better.
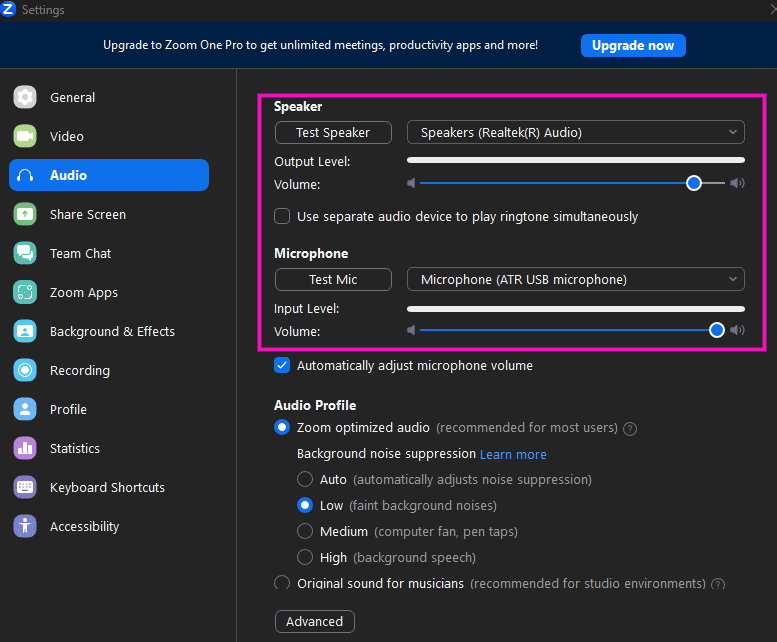
In Zoom, select your devices under Settings > Audio. Pick your mic from the dropdown, click Test Mic, and speak. If nothing registers, you may need to grant Zoom microphone permission in your operating system settings.
Step 3: Change the five Zoom settings that matter
This is the part that separates a publishable recording from an unusable one. Open Settings with the gear icon at the top right.
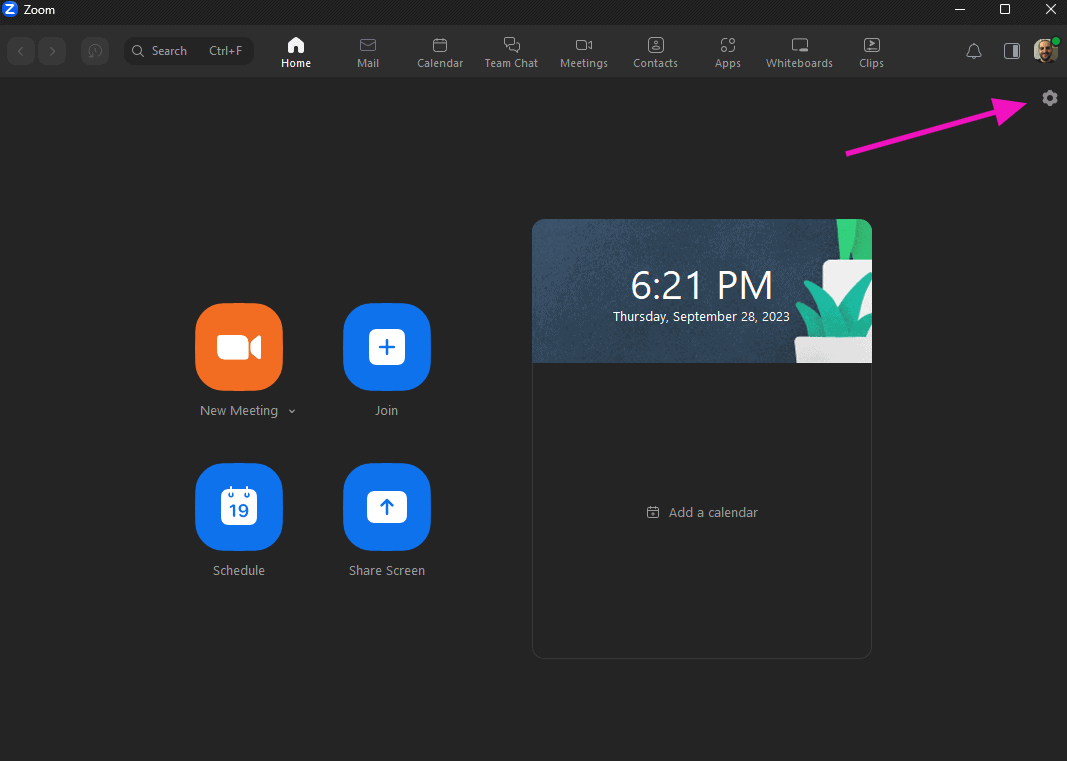
Turn on Original sound for musicians
By default Zoom compresses your audio so the file transfers easily. That is the right call for a meeting and the wrong one for a podcast.
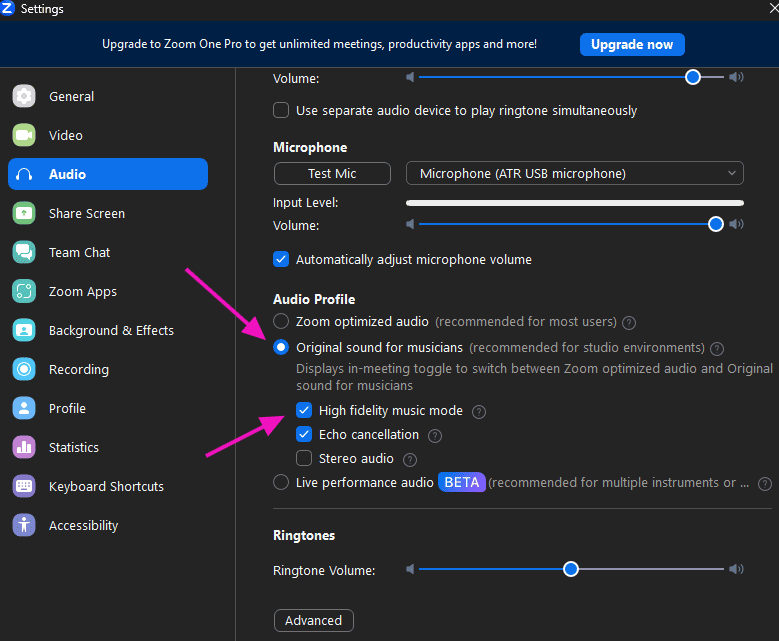
In the Audio tab, find Audio Profile and select Original sound for musicians, then tick High fidelity music mode. Together these strip out Zoom’s built-in processing so the app records your voice closer to how it actually sounded.
Disable echo cancellation
In the same Audio Profile section, untick Echo cancellation. Zoom’s echo cancellation works by ducking audio it suspects is feedback, which on a podcast means it quietly drops the first syllable when two people speak near each other. This is safe to turn off only if everyone is wearing headphones, which is why headphones are non-negotiable.
Disable automatic microphone volume
Still in the Audio tab, untick Automatically adjust microphone volume. Left on, Zoom rides your levels up and down through the episode, so a quiet moment gets boosted into room hiss and a laugh gets clamped. Set your own level once and leave it.
Turn on stereo audio
Tick Stereo audio in the Audio Profile section. It matters less than the others if you are recording a single mic, but it costs nothing and preserves more of the original signal.
Record a separate audio file of each participant
If you only change one setting, change this one.
In the Recording tab, select Record a separate audio file of each participant. Zoom then delivers one audio file per speaker instead of a single mixed file. Editors call this multi-track, or a double ender.
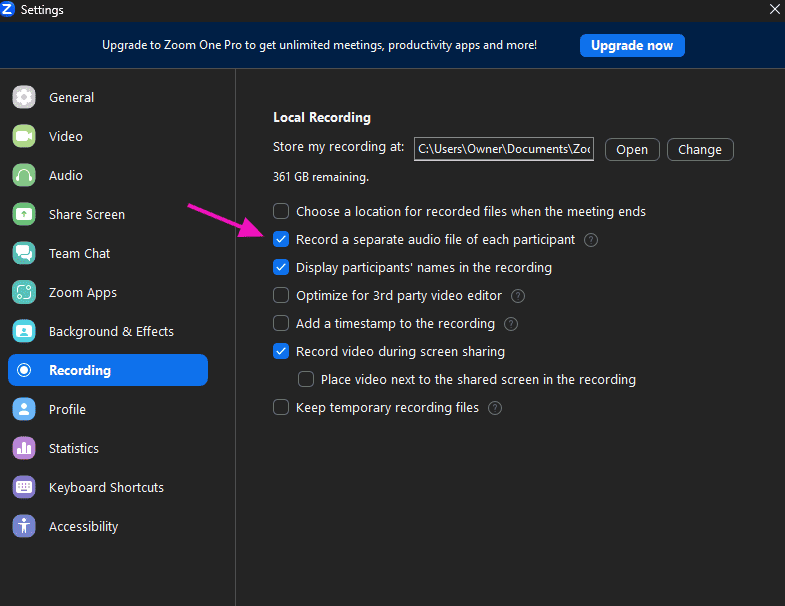
The practical difference is enormous. If your guest recorded quiet, you raise only their track. If someone talks over your question, you cut their interruption without cutting your voice. If a dog barks on their end during your monologue, you delete it. With a single mixed file, none of that is possible, and you are stuck with whatever happened.
Zoom does not offer the same for video. There is no separate video track per participant, so if you are recording a video podcast, you get the composed layout Zoom decides on.
Step 4: Fix your recording space
Zoom can only record what your microphone hears, so the room matters as much as the settings.
- Make sure you will not be interrupted. A sign on the door works better than an assumption.
- Record somewhere with little background noise. If you can hear traffic, so can your listeners.
- Surround yourself with soft surfaces. Sofas, curtains, blankets, and pillows absorb sound that would otherwise bounce back into your mic.
- Use a wired internet connection if one is available, and close every application you are not using.
- Position your mic on a stand or boom arm a few inches from your mouth, and check your microphone setup.
Our podcast studio guide goes deeper on treating a room properly.
Step 5: Run a test recording
Record a few minutes of yourself talking, in your actual space, with your actual gear, and listen back on headphones before you ever book a guest.
You do not want to ask someone who gave you an hour of their time to do it again because a setting was wrong. If your show involves multiple people, run the test with multiple people, since that is the only way to find out whether your connection holds up with two streams running.
This is also a good moment to record your intro and outro or any segment you plan to splice in during editing.
Step 6: Record with Original Sound turned on
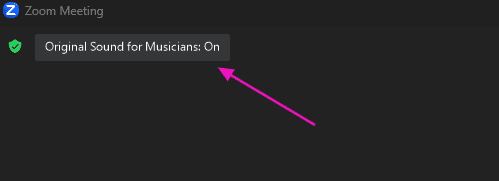
Enabling Original Sound in Settings only makes the option available. You still have to switch it on inside each meeting, and forgetting is the most common way podcasters lose an episode’s audio quality.
Once you are in the meeting, find Original Sound in the top left corner and toggle it on. Then hit Record.
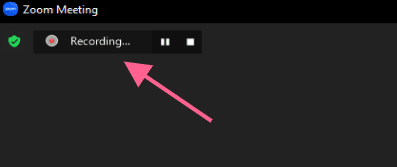
A “Recording…” indicator appears in the upper left so you can confirm it is running. Pause or stop from the control bar at any time, or simply end the meeting, which stops and saves the recording automatically.
Step 7: Find your files and publish the episode
Local recordings save to the folder you chose in Settings > Recording, and you can also reach them from the Meetings tab under Recorded. Cloud recordings live under My Recordings in your Zoom account portal, and paid users get an email with links as soon as processing finishes.
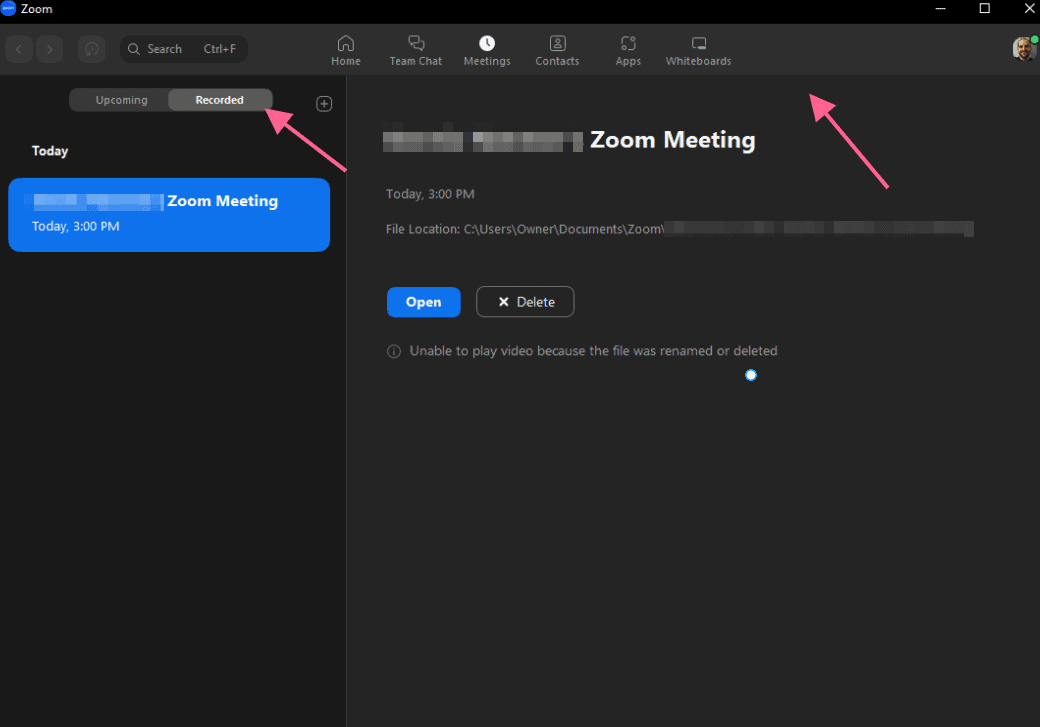
Zoom saves an MP4 video and an M4A audio file, plus one audio file per participant if you enabled separate tracks. Take the audio into your editor, do your cleanup, export, and upload to your podcast host. Castos then handles the RSS feed, distribution to Apple Podcasts and Spotify, transcripts, and analytics.
Local vs cloud recording: which should podcasters use?
A local recording saves to your own device. A cloud recording saves to Zoom’s servers, which is a paid feature.
For podcasting, local is usually the better default. The file is already on your machine, there is no processing wait, and you are not dependent on Zoom’s storage limits. Cloud recording earns its place when you record from a machine you do not control, or when you want the automatic transcript, or when you want a shareable link for a guest who wants to hear the raw conversation.
Neither option changes the audio quality. That is decided entirely by the settings in Step 3.
Zoom settings for podcasting at a glance
| Setting | Where to find it | Set it to | Why it matters |
|---|---|---|---|
| Audio Profile | Settings > Audio | Original sound for musicians | Stops Zoom compressing your voice |
| High fidelity music mode | Settings > Audio | On | Raises the audio bitrate |
| Echo cancellation | Settings > Audio | Off | Prevents dropped syllables when people overlap |
| Automatically adjust mic volume | Settings > Audio | Off | Stops Zoom riding your levels mid-episode |
| Stereo audio | Settings > Audio | On | Preserves more of the original signal |
| Separate audio file per participant | Settings > Recording | On (paid plans) | Lets you edit each speaker independently |
| Original Sound toggle | Inside the meeting, top left | On, every single time | The settings above do nothing until this is on |
Where Zoom falls short for podcasting
Zoom is a video conferencing tool that happens to record. Being honest about the gaps will save you a bad launch.
It records the internet stream, not the source. Every dropout, robot voice, and moment of compression on your guest’s end is baked into the file. Dedicated podcast tools record locally on each participant’s machine and upload the clean file afterward, so a shaky connection costs you nothing.
No separate video tracks. You get Zoom’s composed layout. If you want to cut between speakers in post, Zoom cannot give you the footage to do it.
No built-in podcast workflow. There is no episode organization, no show notes, no publishing. You export a file and take it elsewhere.
Guests may hit their own limits. If your guest is on a free account and hosts the call, you inherit the 40 minute cap.
Zoom vs dedicated podcast recording tools
| Tool | Records locally per guest | Separate video tracks | Guest setup | Best for |
|---|---|---|---|---|
| Zoom | No | No | Everyone already has it | Convenience and guests who will not install anything |
| Riverside | Yes | Yes | Browser link, no install | Video podcasts where quality is the product |
| SquadCast (Descript) | Yes | Yes | Browser link, no install | Audio interview shows that edit in Descript |
| Zencastr | Yes | Yes | Browser link, no install | Audio-first shows on a budget |
| Podcastle | Yes | Yes | Browser link, no install | Solo creators who want recording and editing together |
The honest summary: if your guests are hard to schedule and easily lost to friction, Zoom’s familiarity is worth real audio quality. If you can ask a guest to click a link and grant mic access, a dedicated tool will give you a better master file every time.
We compare the wider field in our guide to podcast recording software, our roundup of the best video podcast recording software, and our list of Zoom alternatives for creators.
Recording a standard Zoom meeting
Not every recording is an episode. If you just need to capture a regular meeting, the process is shorter.
As the host on desktop, start the meeting and click Record in the control bar. A “Recording…” message appears in the upper left, and you can pause or stop at any point. When you finish, the file lands in the folder set under Settings > Recording.

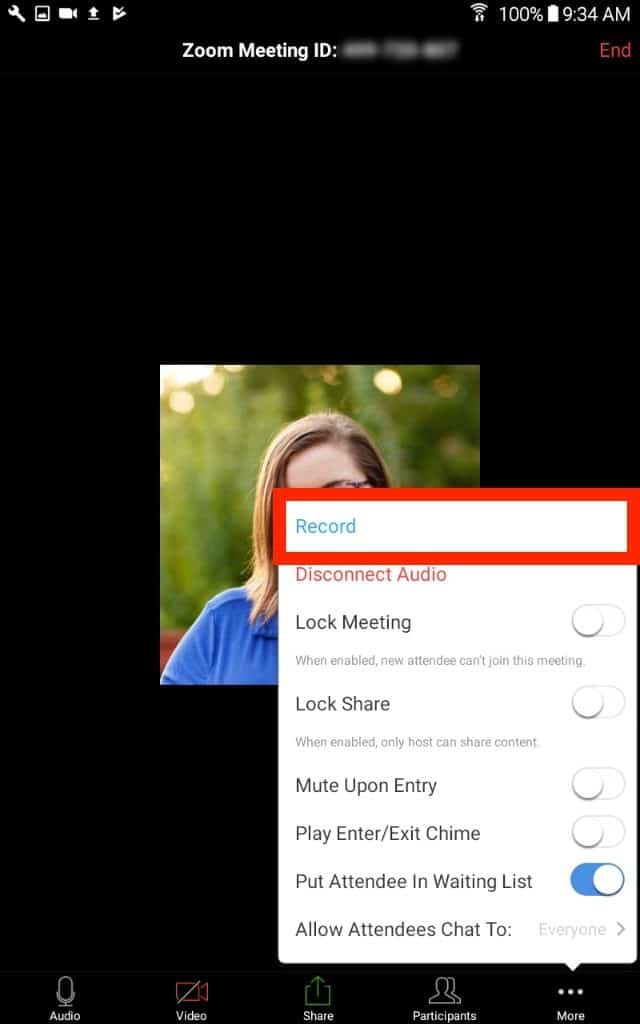
On mobile, recording requires a paid account. Tap More in the control bar, then choose Record to the Cloud on iOS or Record on Android. If the option is missing, the account is not a paid one.
If you are not the host, the host has to grant you permission first. They open the participant list, click your name, tap More, and choose Allow Record.
One thing worth knowing regardless of what you are recording: whether you need everyone’s consent depends on your local wiretapping laws. Some jurisdictions need only one party to agree, others need everyone. Zoom notifies participants when recording starts, which handles the courtesy, though it does not settle the legal question for you.
Frequently asked questions
Can you record a podcast on Zoom for free?
Partly. A free account records locally to your computer, but group meetings stop at 40 minutes and separate participant tracks are a paid feature. Solo shows and short conversations work fine on free. Interview shows usually end up paying.
Does Zoom let you record audio only?
Yes. Zoom always saves an M4A audio file alongside the MP4, so you can ignore the video. If your show is audio only, turn your camera off before recording so more bandwidth goes to the audio stream.
How do I record a podcast remotely with guests on Zoom?
Send a normal Zoom link, ask your guest to use headphones and a wired connection, enable separate participant tracks before you start, and run a short test. Because Zoom records what arrives over the internet, your guest’s audio is capped by their connection quality, not by your settings.
Can you record separate audio tracks for each guest on Zoom?
Yes, on a paid plan. Turn on “Record a separate audio file of each participant” under Settings > Recording. Zoom cannot do the same for video.
Is Zoom good enough for a professional podcast?
It is good enough to launch, and good enough for shows where booking guests easily matters more than pristine audio. It is not the best available, because Zoom captures the compressed stream rather than the raw audio on each machine.
What is the best way to record a podcast virtually?
Record locally on every participant’s machine and combine the files afterward. Dedicated podcast tools do this automatically. Zoom does not, which is the main quality gap between them.
Where do recorded Zoom meetings go?
Local recordings go to the folder in Settings > Recording, and appear under Meetings > Recorded. Cloud recordings live in My Recordings in your account portal.
Can I convert a Zoom recording to another format?
Zoom converts recordings to MP4 and M4A automatically when the meeting ends. If that process is interrupted, open Meetings > Recorded, select the file, and click Convert.
Turning your Zoom recordings into a real show
Zoom gets you a file. Everything after that, the RSS feed, distribution to Apple Podcasts and Spotify, transcripts, analytics, and a place for people to actually listen, is what a podcast host does.
If you are still planning the show itself, start with our podcasting 101 guide. If the recording side is what you want to strengthen, our guides on inviting someone to an interview and preparing to conduct an interview will get more out of every conversation you record. And if remote recording is going to be your normal, our guide to recording a podcast remotely covers the wider workflow beyond Zoom.
Launch Your Podcast In Minutes
Castos makes launching simple with one-click setup, automatic distribution to all platforms, and professional hosting. No technical skills required.
Start your 14-day free trial